TAG | Additional details
This section contains all default values for all necessary codes that TAG need as a basic data; these values can be initialized automatically by the system by performing "Initialize Default values" action as mentioned before.
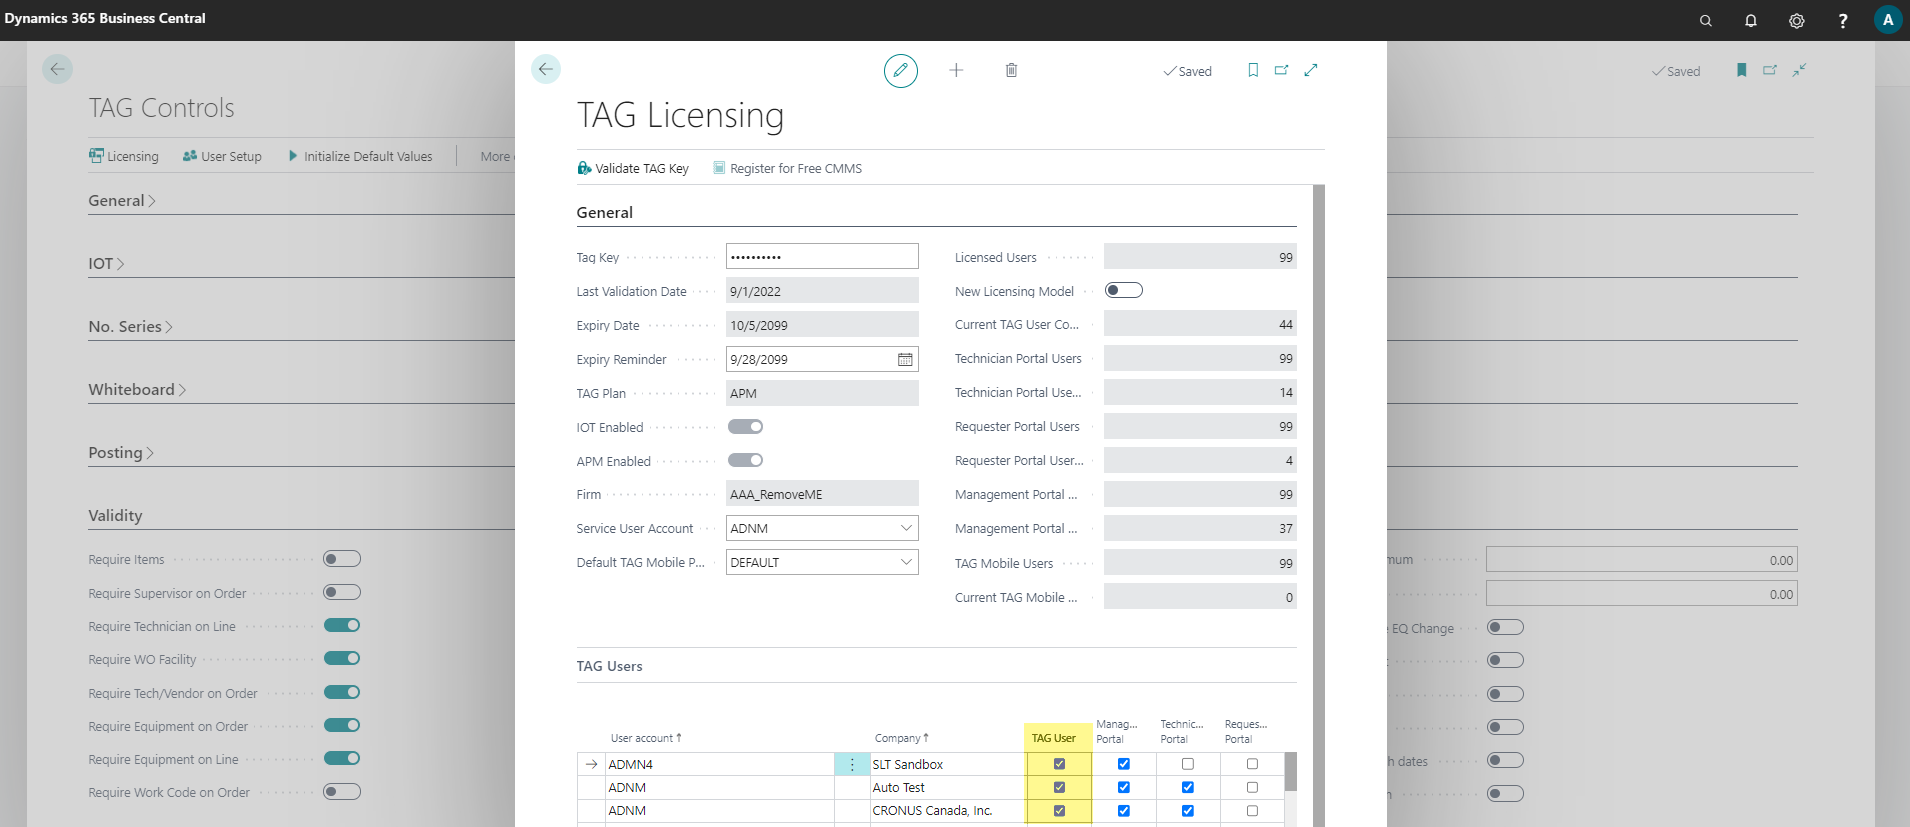
- TAG PLAN NOTE: If TAG Plan value is CMMS or EAM then there is an expiry date and a defined number of user license. On expiry TAG plan will change to "Express" and licensed users will be set to "0". TAG license users are required to modify TAG data by accessing documents and master files.
- To add TAG Licensed Users, Extend Expiry Date, or perform deeper trials to EAM functionality, then TAG Plan will need updated through a license key.
Typical Setup on TAG Controls
- Note: many of the values described below are set by action "Initialize TAG Data"
Click "Edit" on the TAG Controls page
Set the TAG Controls as in the below screenshot
- The following are default general parameters set when a Work Order is created:
- Requested = 1D
- Start = 1D
- Due By = 10D
- Expiration = 360D
Set the TAG controls as in the below screenshot
- The following are controls that define how TAG is used and displayed:
- Calculation Method = Hours
- Allow UDN assignment = yes
- Equipment list option = Overview
- TAG Plan Selection = "value" on license (note: TAG Plan is non-editable as this is auto-assigned)
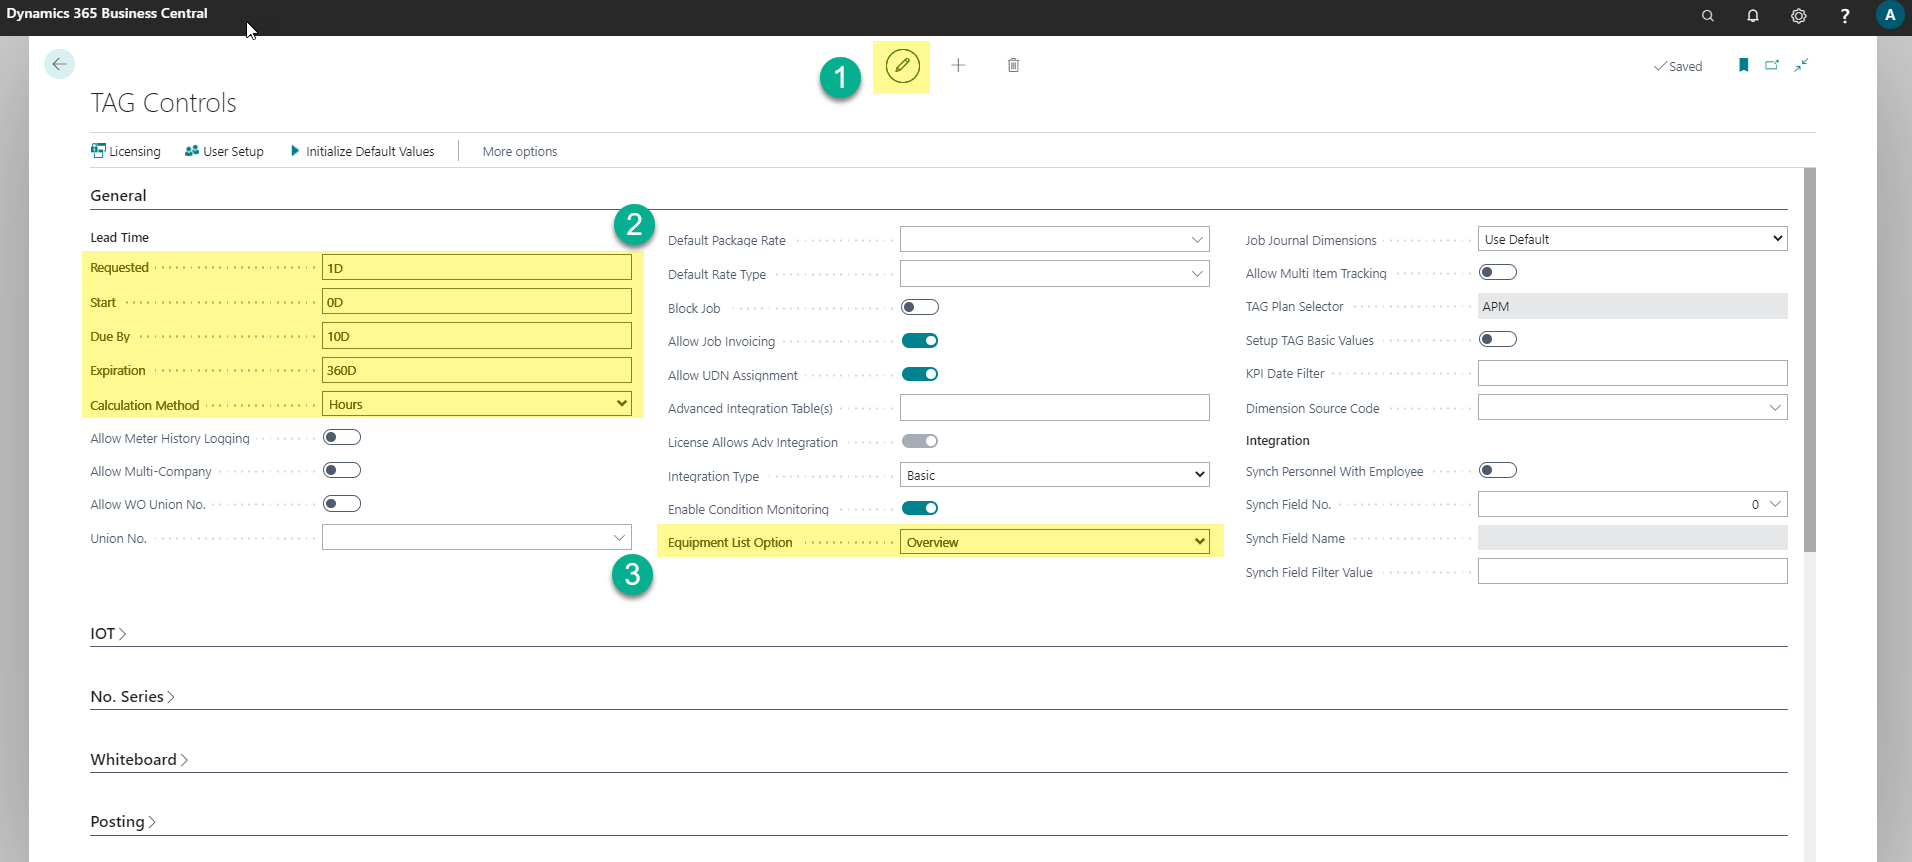
- Note: TAG Plan Selector is populated automatically to "CMMS" value after initial opening the page of the page. It expires to Express. To add TAG Licensed Users, Extend Expiry Date, or perform deeper trials to EAM functionality, then TAG Plan will need updated through a license key.
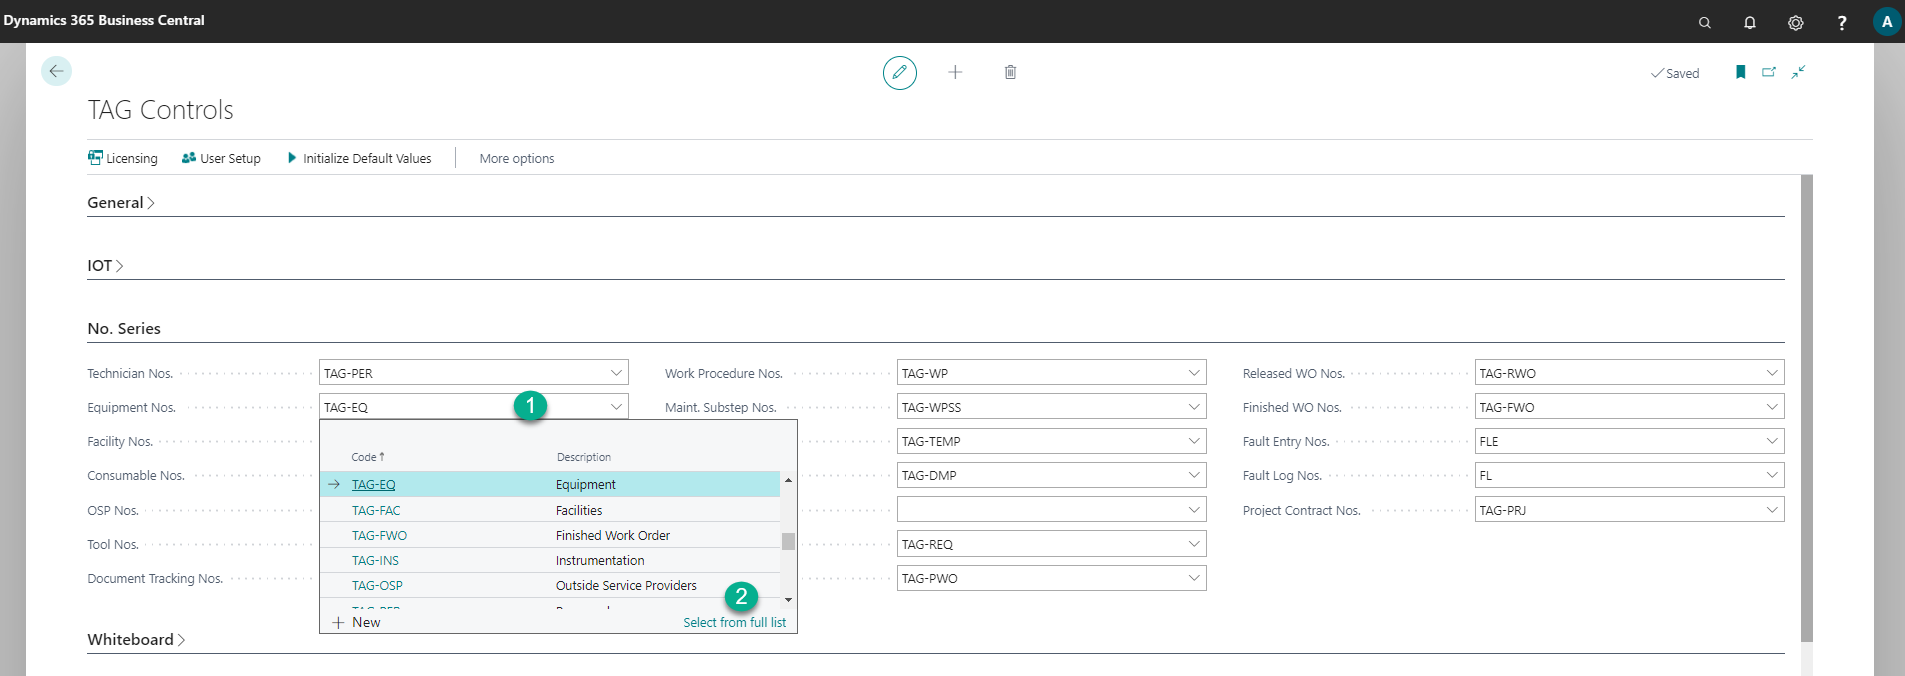
No Series FastTab Setup on TAG Controls:
Important Note: it is required that each of the Number Series below are setup. Failure to do so will result in an error when setting the first code for that part of TAG.
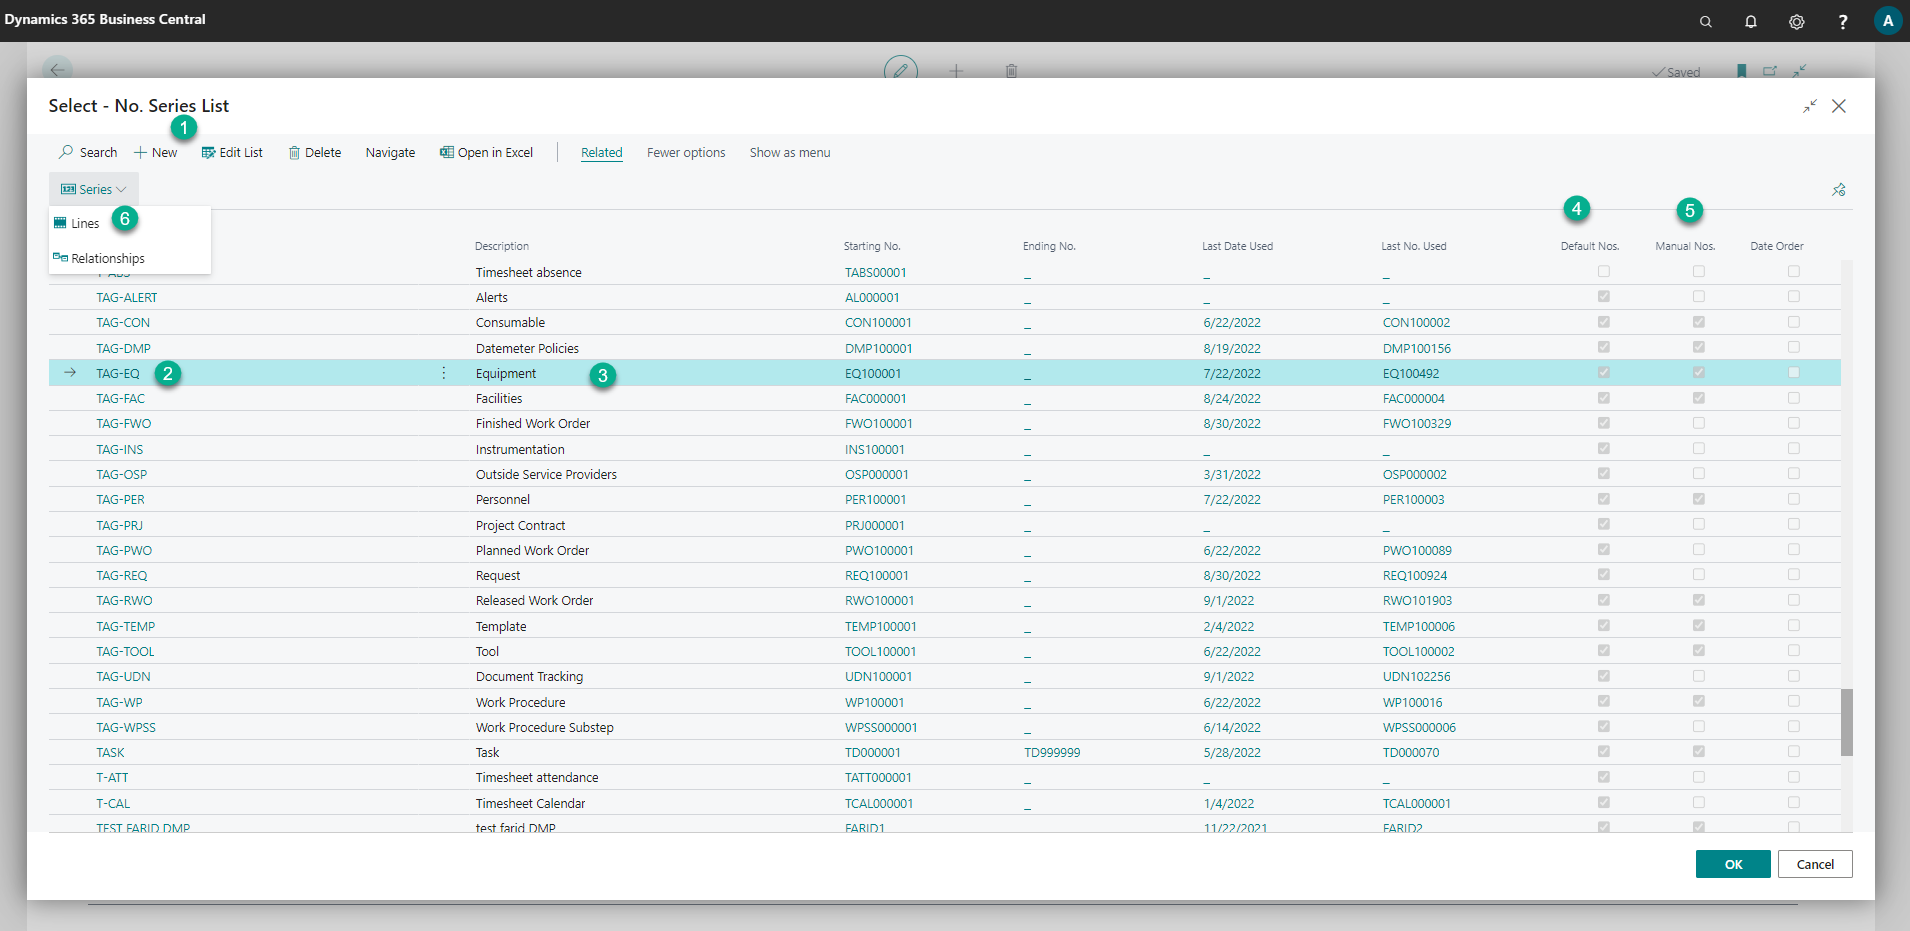
Required No. Series:

The final result of the No series FastTab set-up will be as shown in the screenshot directly below. It is assumed that the user has knowledge of usage and how to set up standard NAV No. Series. TAG instructions provide the specific setups for each.
- Note: Technician and Facility number series will be blank, this means that the numbering will be manual and not auto assigned.

Steps to set each No. Series:
- Open No series FastTab on Control page
- Click on the *"Assist" button (with the …) to open the No Series list
- Click on "Select from the full list" on the No series list.
- Select "New" from the No Series list
- Create each No series Code using the suggested code, description, default value, manual value, prefix with starting no and last no; as in the table above.
- Once the code is created, use the lines button to assign the starting no and last no.

Follow the same steps to setup the rest of No series values.
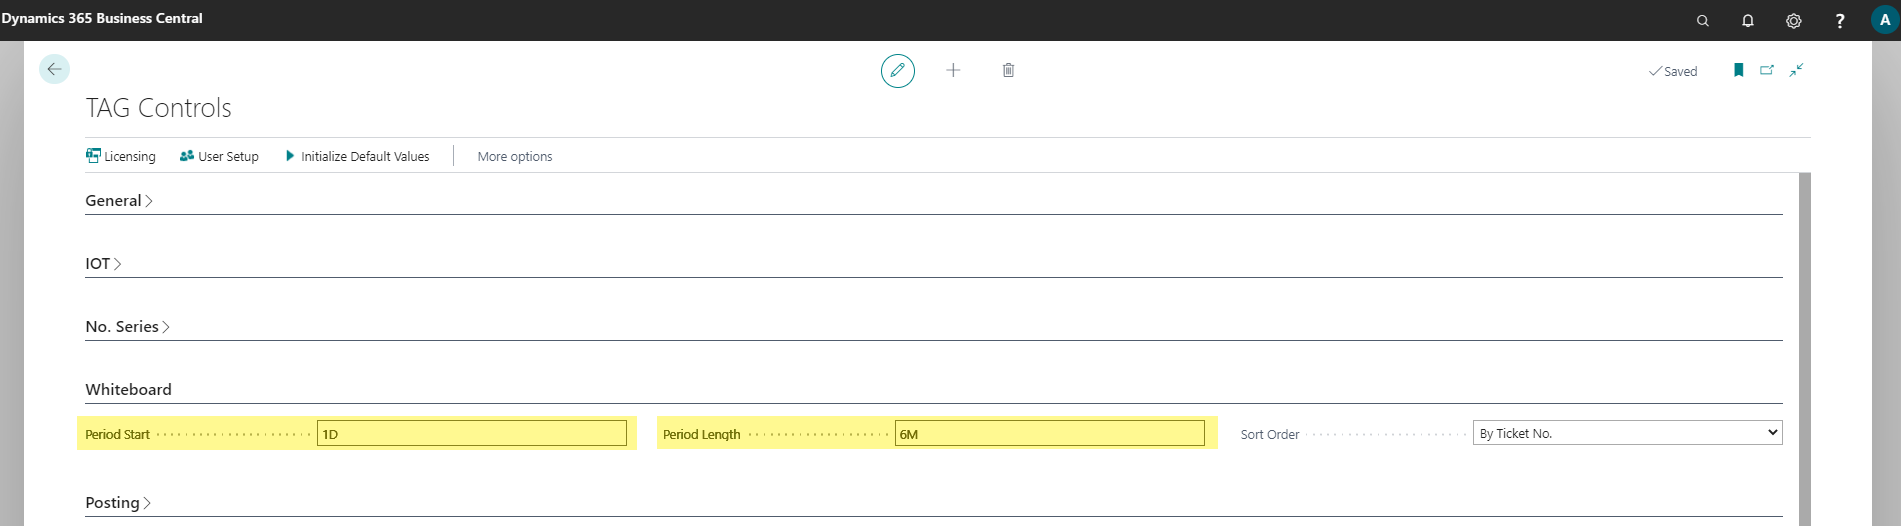
Whiteboard FastTab Setup on TAG Controls:
- Click on the Whiteboard FastTab for the Control page
- Set the default values to be used by the Whiteboard:
- Period start = "-1W"
- Period length = "1Y"
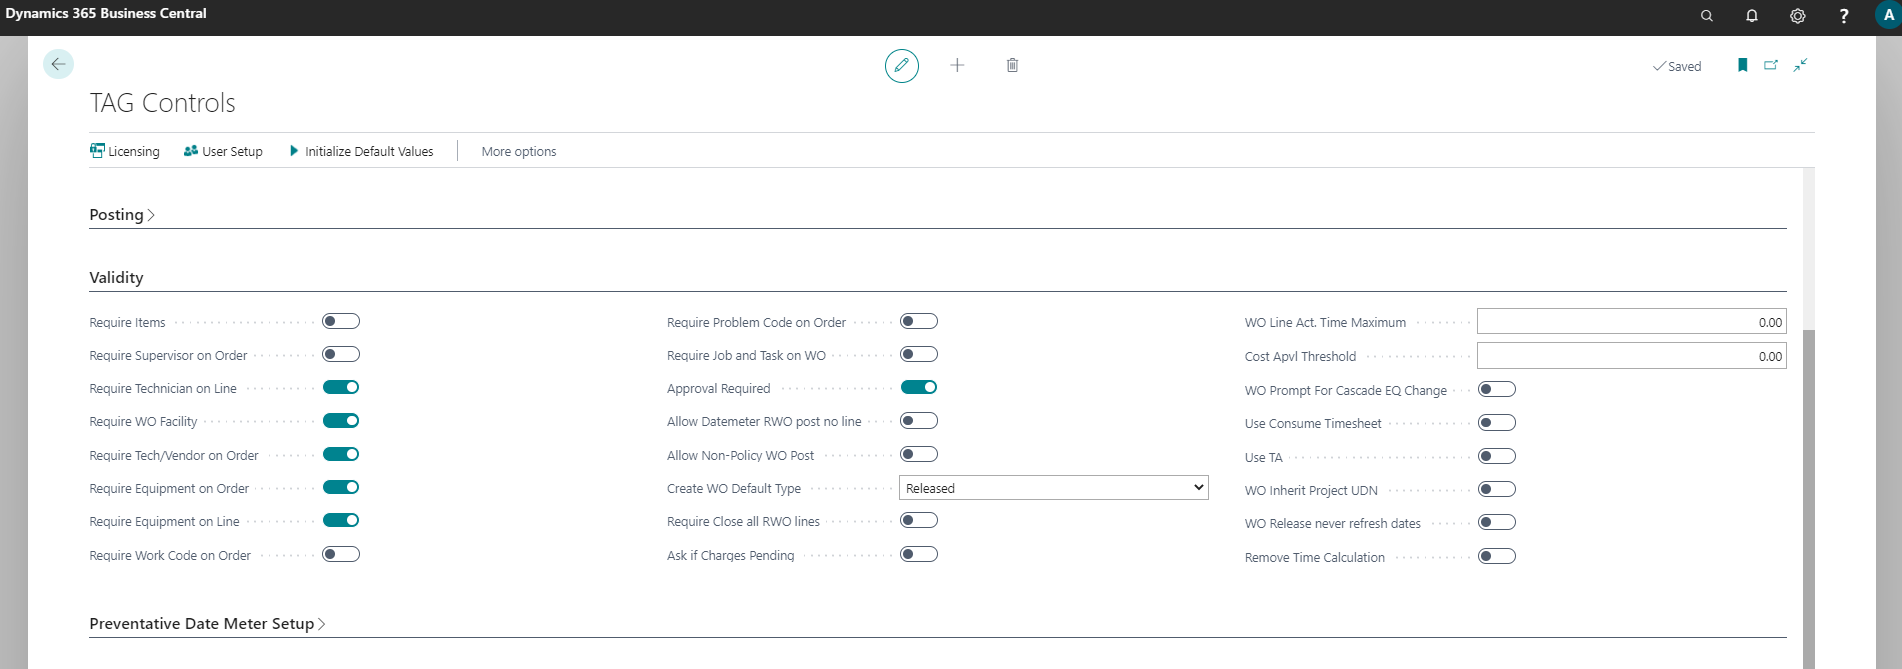
Validity Setup on TAG Controls:
Click on the Validity FastTab for the Controls page
Set the values to be use by TAG to determine default requirements
- Require items = no
- Require supervisor on order = no
- Require technician on line = yes
- Require Tech / Vendor on order = yes
- Require equipment on order = yes
- Require equipment on line = yes
- Leave other fields to default values
Setup of TAG User Setup
- User Set-up → this list defines how each user can work with TAG functionality.
- Note: A TAG user must exist in order to post a Work Order.
- Note: the initial ADMIN USER to set TAG Plan will be added automatically to TAG User setup. There is a limitation of the number of users allowed to use TAG as described in TAG licensing.
- If TAG Plan for testing/validating, then the testing user must be assigned on TAG Licensing page. Additional users can be added with the TAG Plan license.
- If TAG Plan for Testing/Validation, see TAG Plan note in section 5. Appendix 1

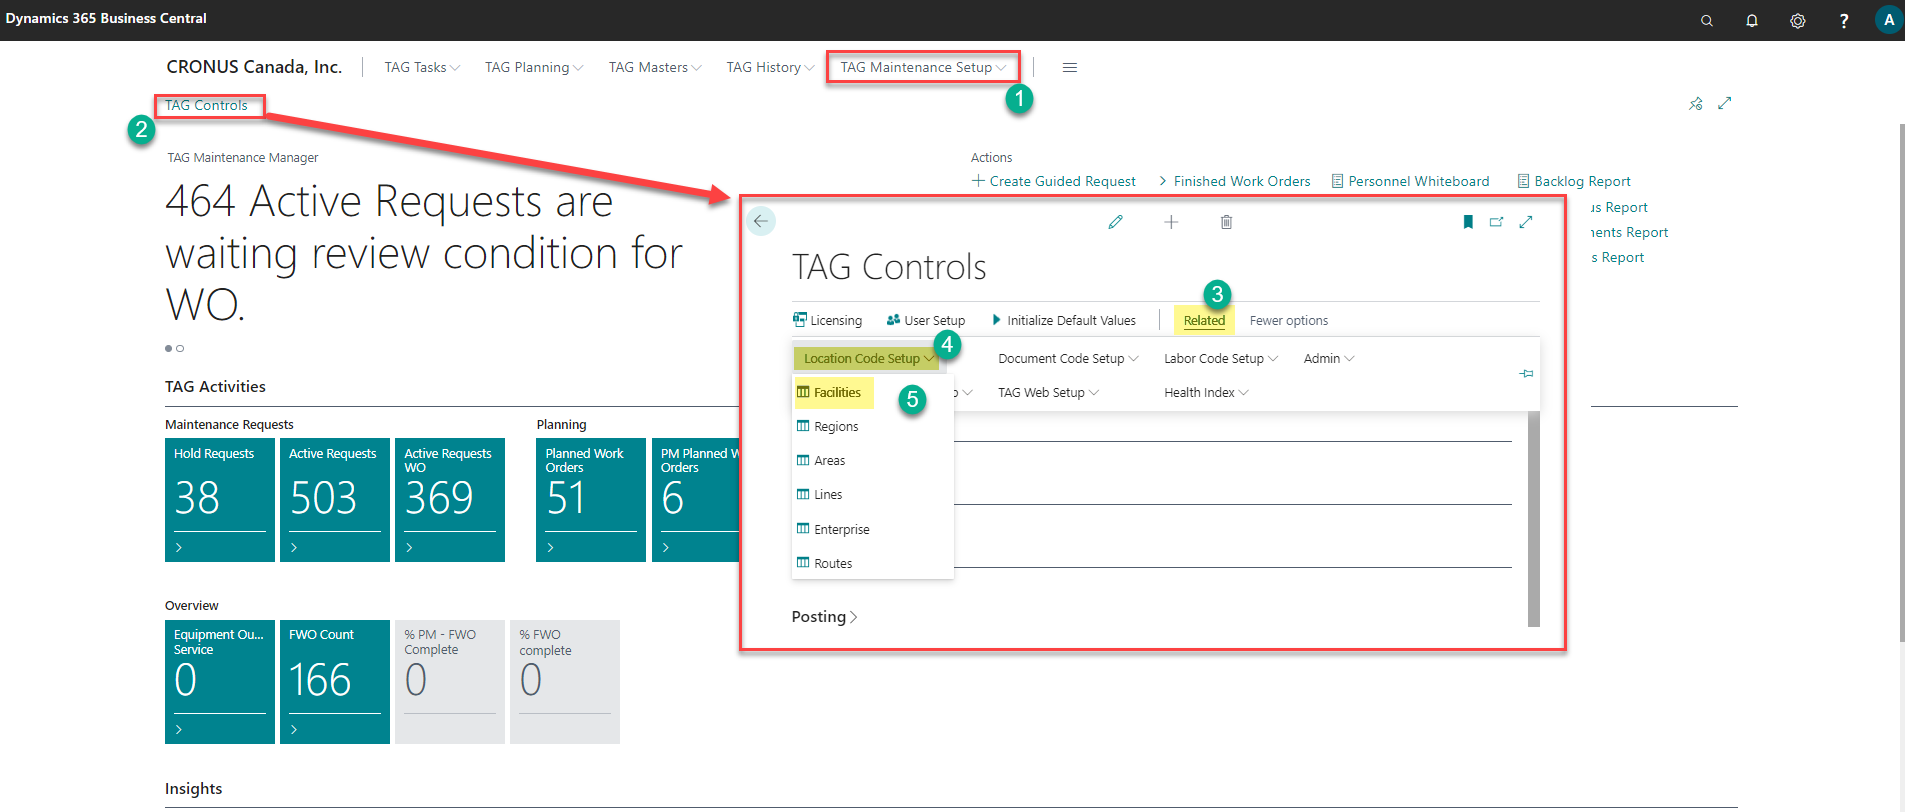
Setup of Maintenance Codes
How to get there:
In the Controls page, under Navigate, the user will see a number of sub menus lists, one for each code that must be set-up in TAG. General instructions on how to set up the codes:
Select the list
Select "New" on the action bar
- Some codes will open a card to fill in the values
- Some codes will allow edit to the list to fill in the values
Create the code, with description, and fill in the required values
- Note: at least one code value is required for each
Required Codes and purpose:
- Facility, region, enterprise → these codes define the location of the equipment
- Personnel → this code defines the technicians that will be assigned to work tasks
- Status, Maintenance Type, Order Type, Work Code, Problem Code, Reason Code → these codes help define the Work Order header for filtering and actions.
“Maintenance Setup” Menu:

Maintenance Setup >TAG Facilities
The following steps allows you to create a new facility:
- Go to the Controls page, under Navigate, click "TAG Location Codes Setup" and then on "TAG Facilities" to open the list of existing facilities
- Click on the "New" button on the ribbon to create a new facility
- Manually type the desired code (No Number Series is used here)
- Type the name, address and region fields
- If the region does not exist, you can create it from the region field on the facilities record
- Close the page and refresh the list to validate the facility creation.

Maintenance Setup > TAG Region:
Create a new Region:
- Go to the Controls page, under Navigate, click on "TAG Location Codes Setup" and then on "TAG Regions" to open the list of existing regions
- Click on the "New" button on the ribbon to create a new region.
- Add a code with description
- Close the page and refresh the list to validate.


Follow the same steps to manage TAG areas, TAG Lines and TAG Enterprise.
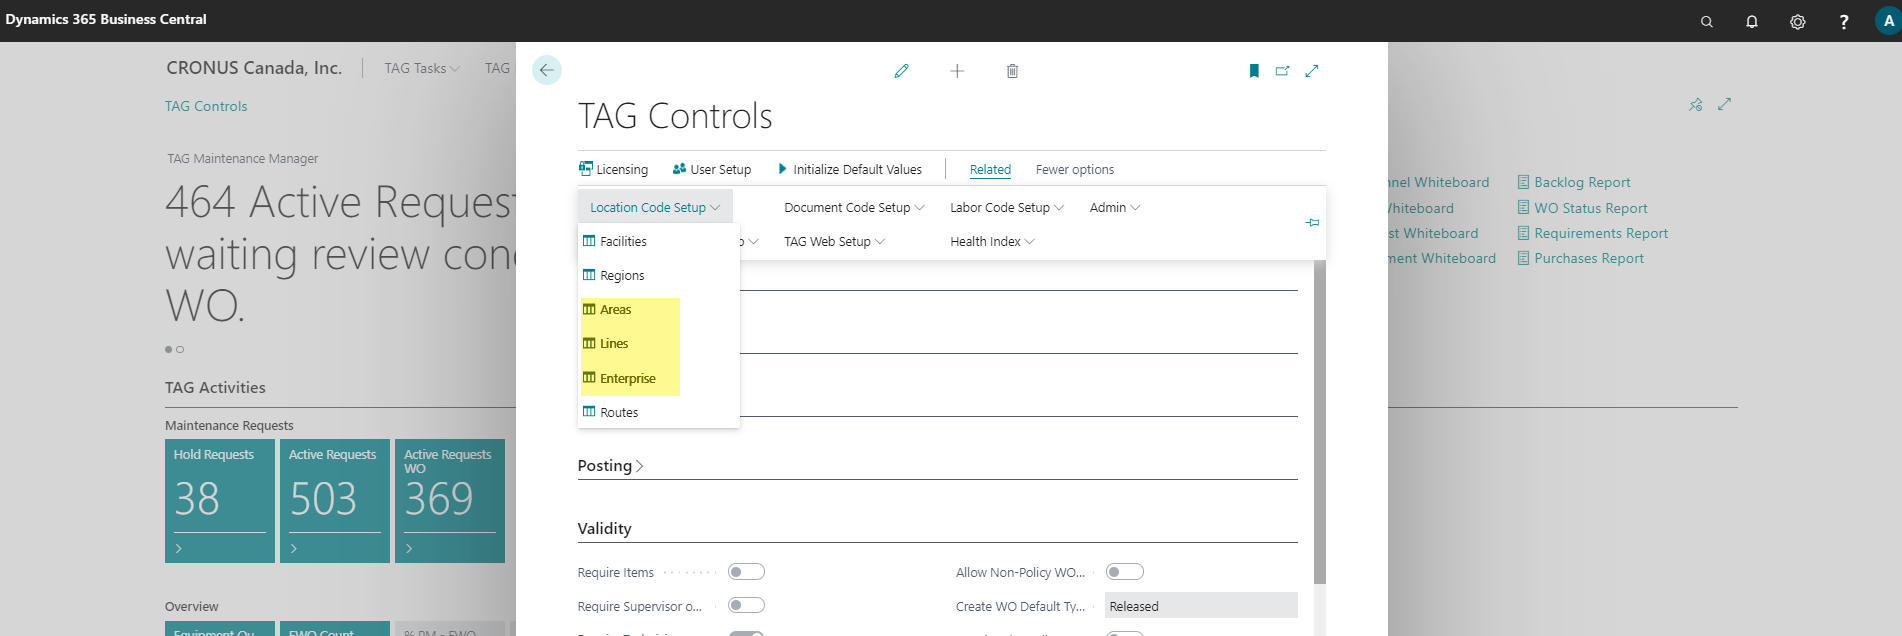
Maintenance Setup > TAG Equipment code setup:
Create a new Equipment group:
- Go to the Controls page, under Navigate, click on "TAG Location Codes Setup" and then on "TAG Equipment Group" to open the existing equipment group list
- Click on the "New" button on the ribbon to create a new equipment group.
- Enter code and description fields.
- Close the page and refresh the list to validate.

Follow the same steps to create the rest of TAG Equipment code setup:
- TAG Equipment SubGroups
- TAG Main Codes
- TAG Primary Codes
- TAG Secondary Codes
Maintenance Setup > TAG Document code setup:
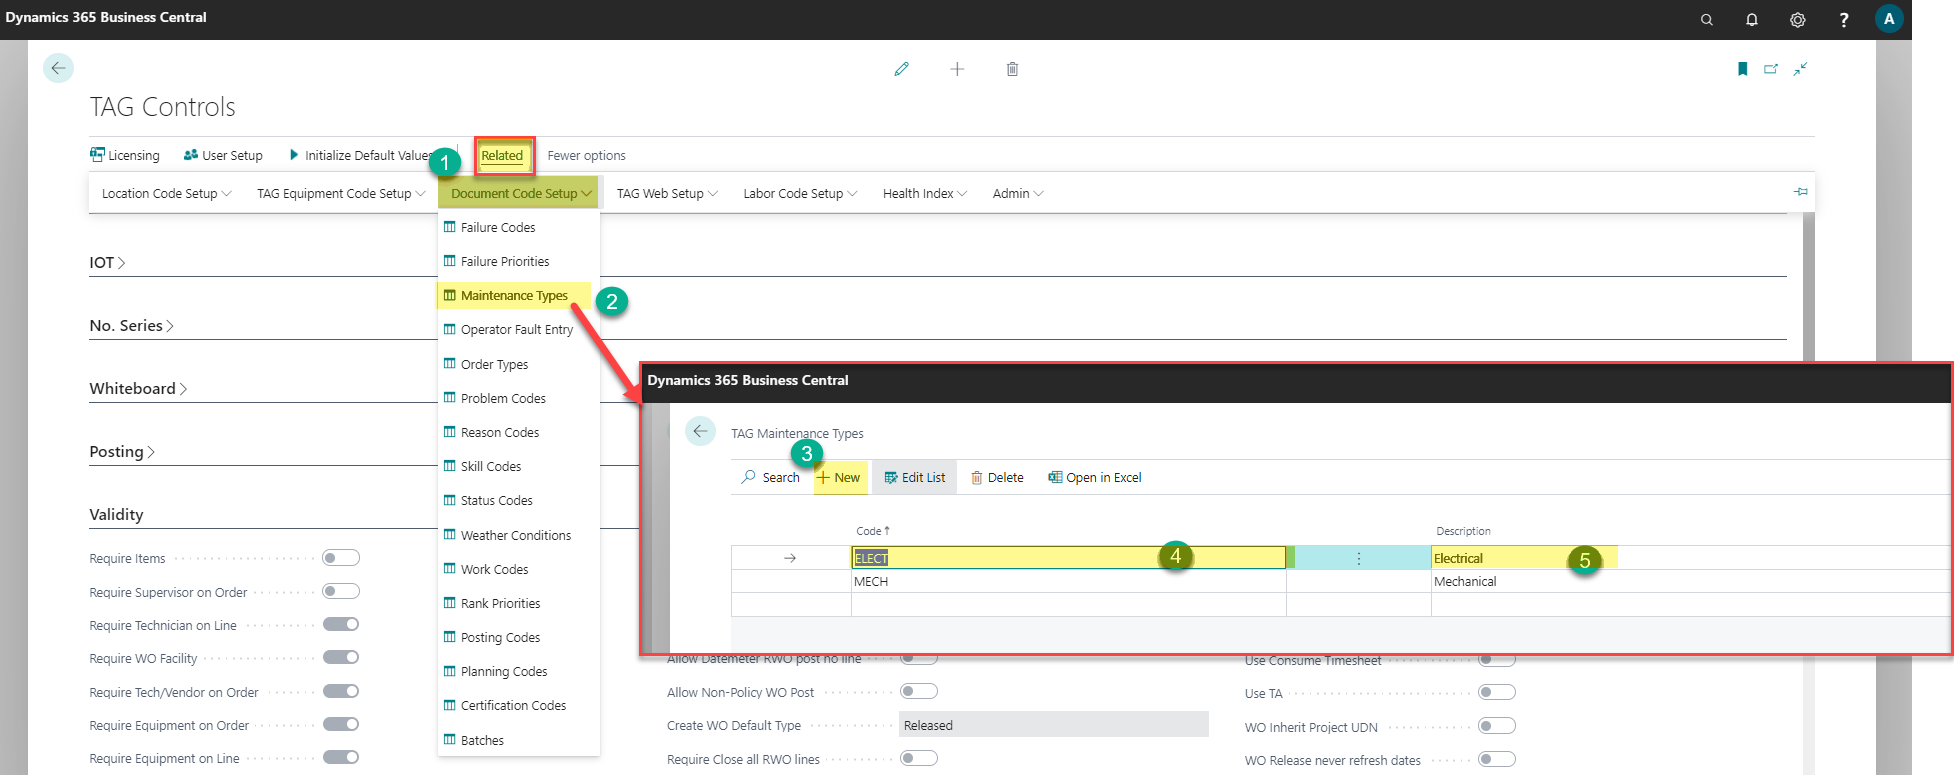
Create a new maintenance type:
- Go to the Controls page, under Navigate, click on "TAG Document Codes Setup" and then on "Maintenance Types" to open the maintenance types list.
- Click on the "New" button on the ribbon to create a new maintenance types.
- Enter the code and description fields:
- Close the page and refresh list to validate.
Maintenance Setup > TAG Document code setup:
Create a new order type:
- Go to the Controls page, under Navigate, click on "TAG Document Codes Setup" and then on "TAG Order Types" to open the maintenance types list.
- Click on the "New" button on the ribbon to create a new order type.
- Enter the code and description fields.
- Close the page and refresh list to validate.

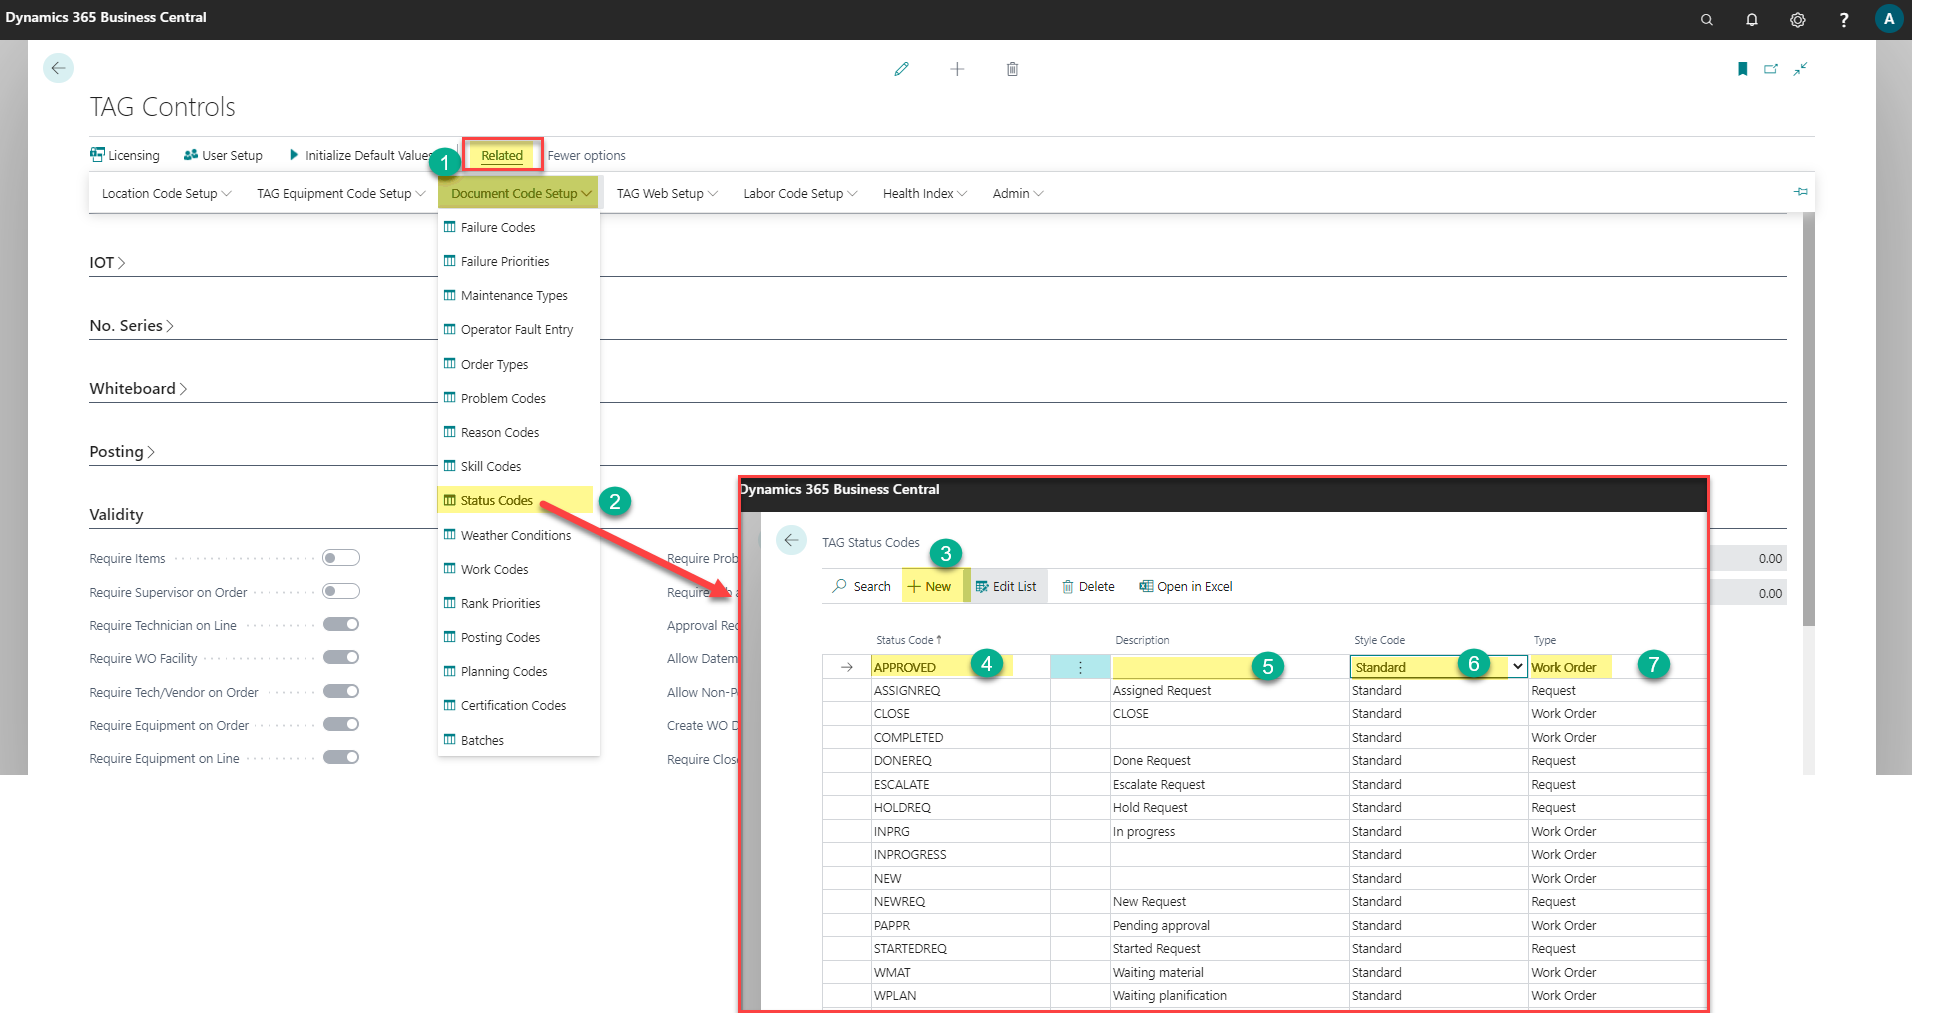
Create a new Status:
- Go to the Controls page, under Navigate, click on "TAG Document Codes Setup" and then on "TAG Status Codes" to open the status list.
- Click on the "New" button on the ribbon to create a new status.
- Enter the status code, description and style code
Follow the same steps to create the rest of Maintenances Codes:
- TAG Work Codes
- TAG Problem Codes
- TAG Reason Codes
- TAG Rank Priorities
- TAG Skills
- TAG Certifications
- TAG Failures
- TAG Meter Types
- TAG Posting Codes
Maintenance Setup > TAG Labor code setup:
Create a New Personnel Group:
- Go to the Controls page, under Navigate, click "TAG Labor Codes Setup" and then on "TAG Personnel Group" to open the existing list.
- Click on the "New" button on the ribbon to create a new personnel group.
- Tape the code, description and unit cost fields and close the page

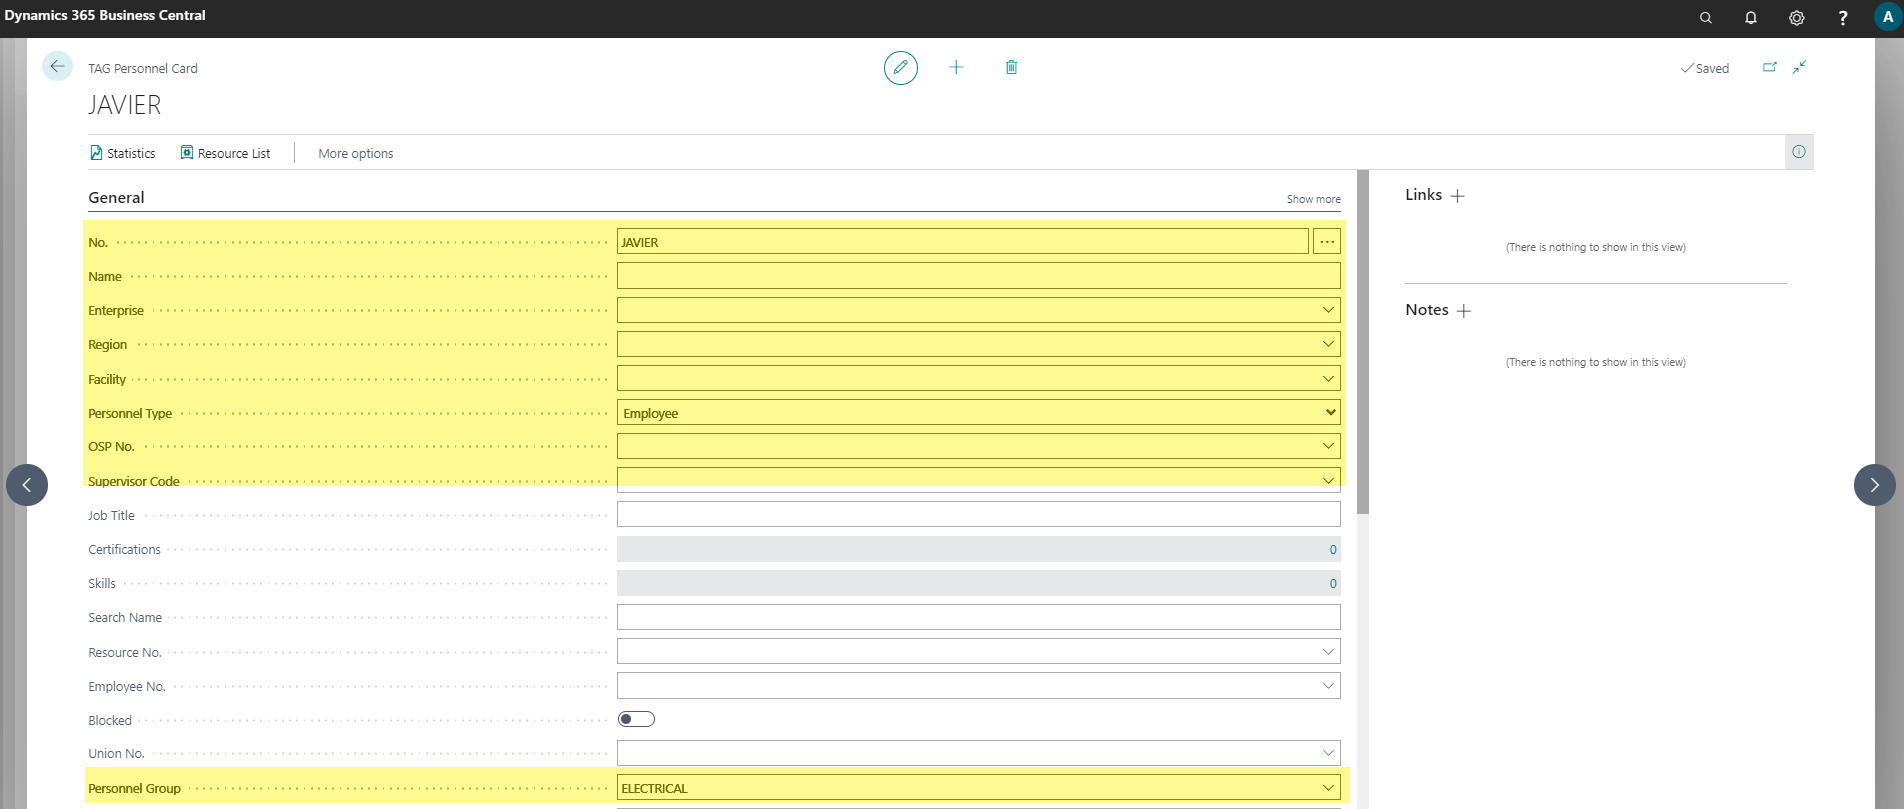
Create a new technician or supervisor
- Go to the Controls page, under Navigate, click "TAG Labor Codes Setup" and then on "TAG Personnel" to open the personnel list.
- Click on the "New" button on the ribbon to create a new technician.
- Type manually the desired No.
- Type the name, region, facility, personnel type, personnel group fields.
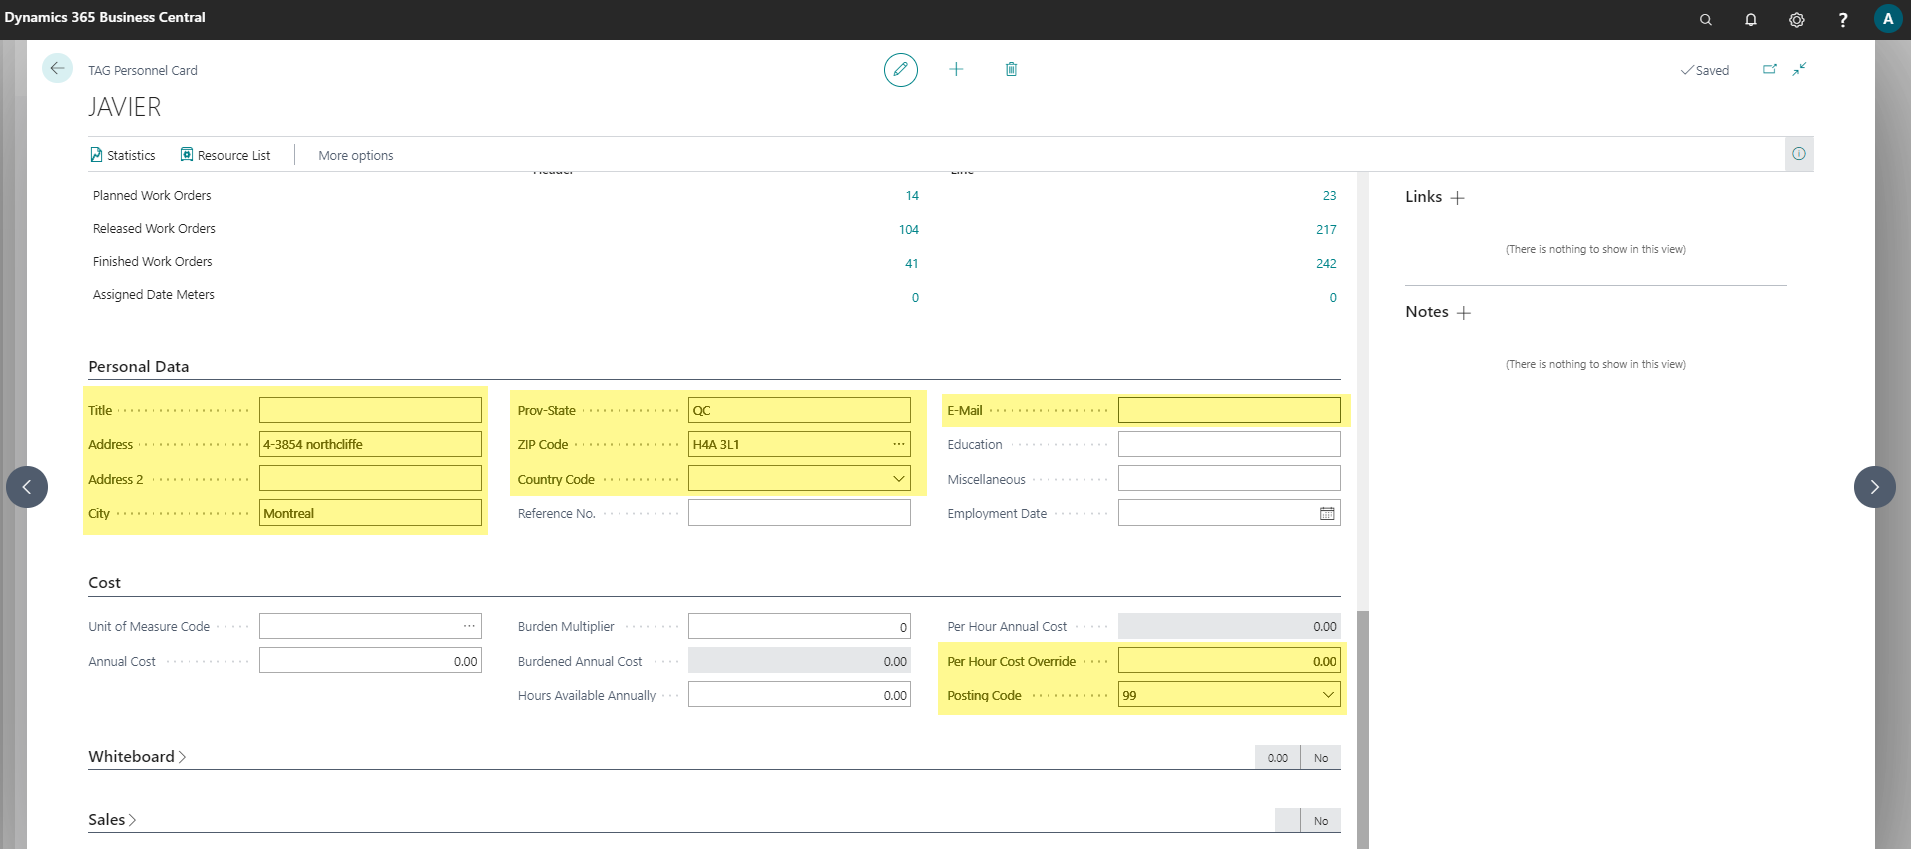
- In the Personnel Data, type the desired fields (address, tel, fax…).
- In the Cost FastTab, enter the per hour cost override and posting code fields.
- Close the page and refresh the list to validate the personnel creation.

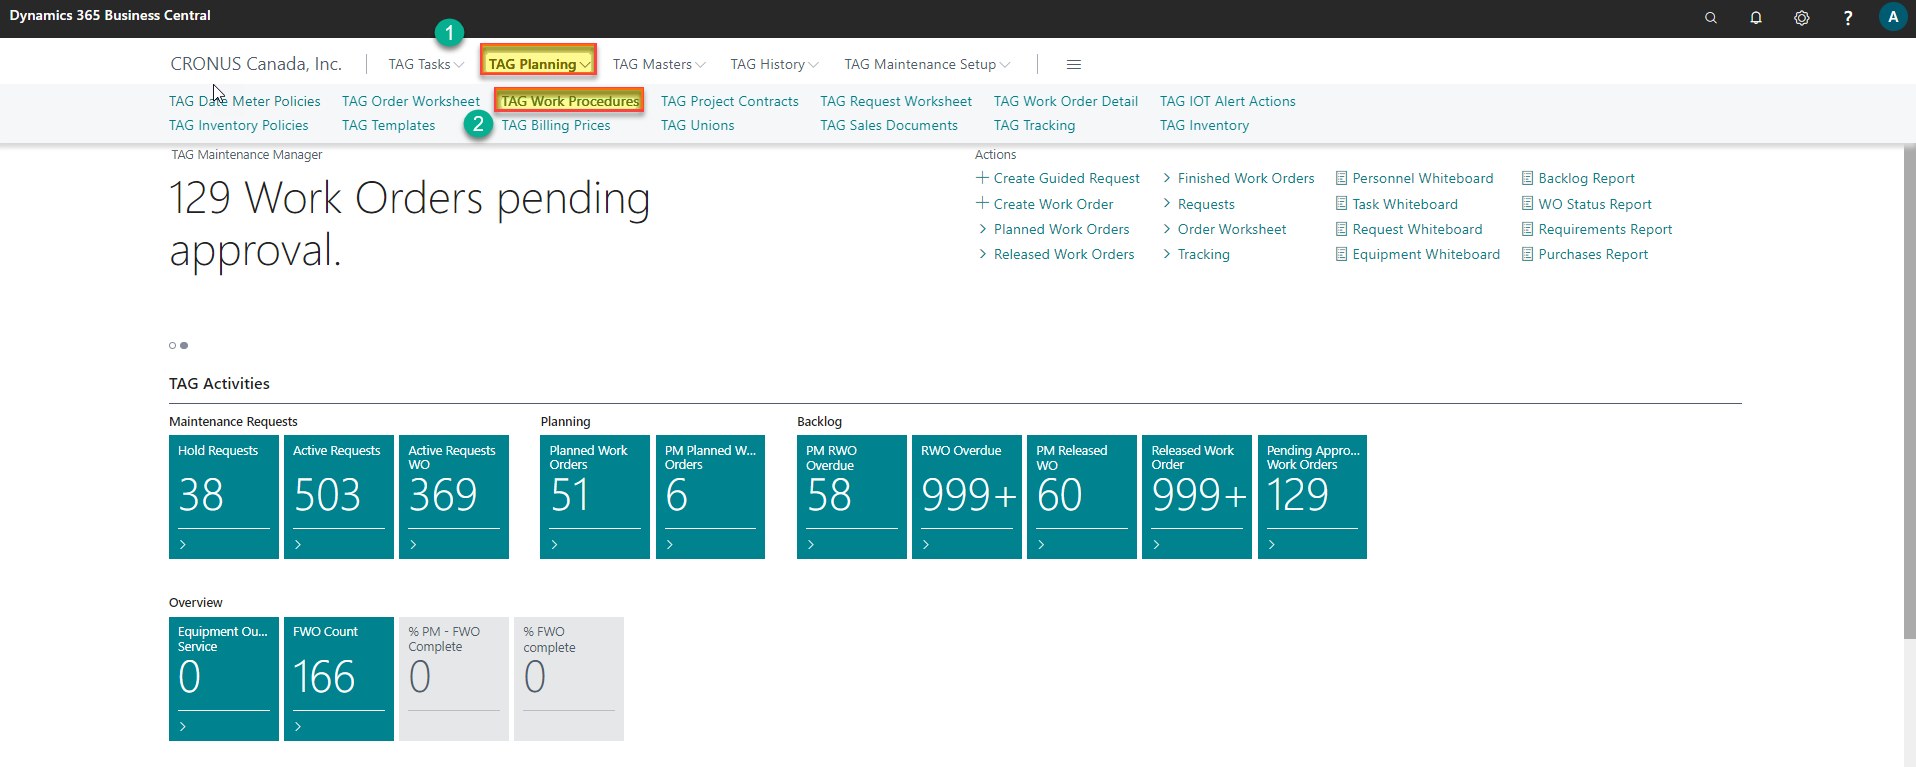
TAG Planning
TAG Work Procedure
The following steps allow you to create a new work procedure:
- In the TAG Planning menu, click on the "TAG Work Procedure" to open the work procedure list:
- Click on the "New" button on the ribbon to create a new work procedure:
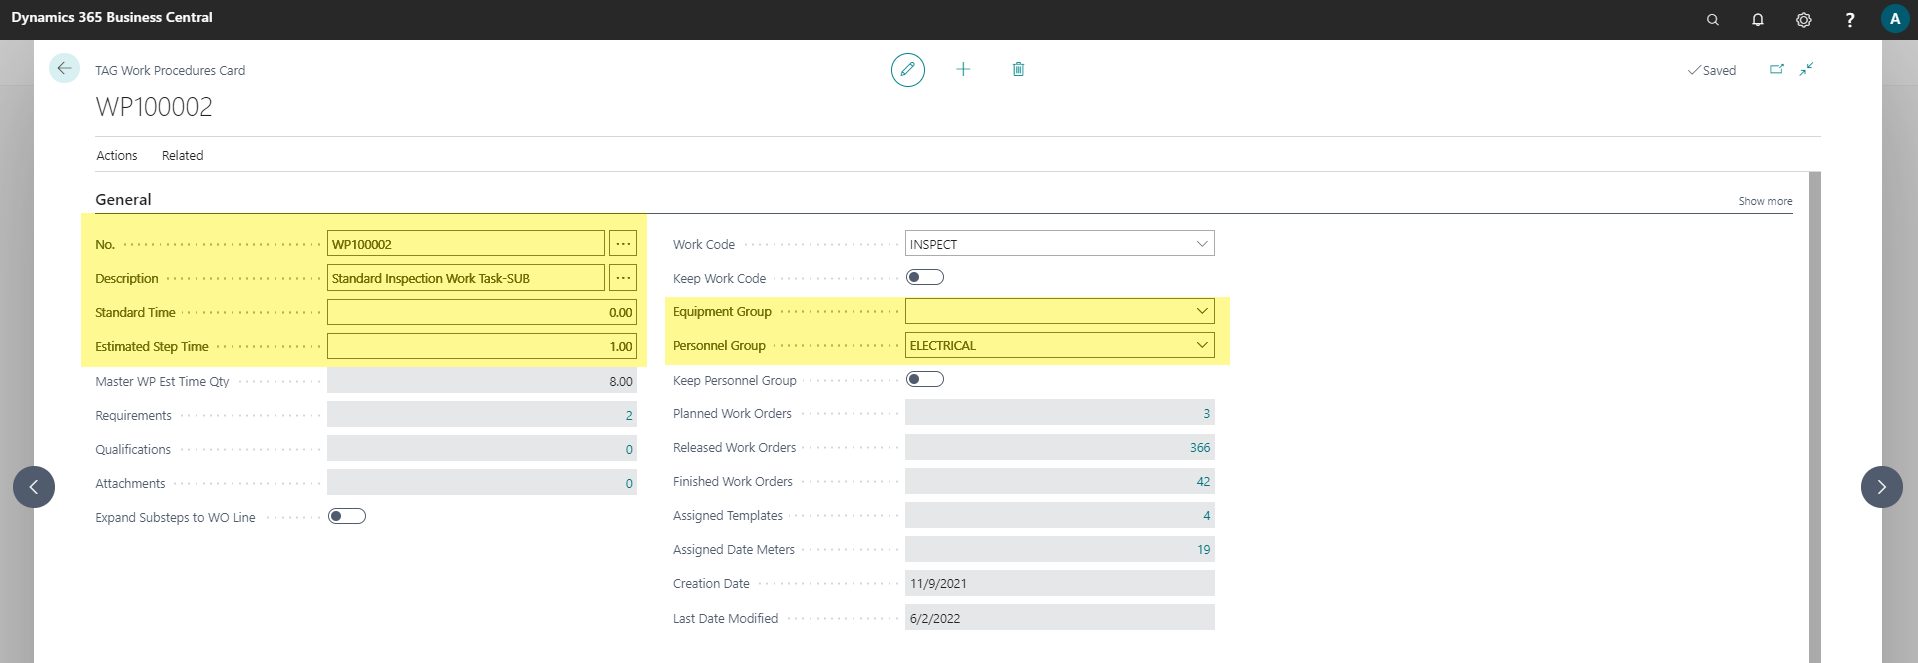
- On the General FastTab, enter No, description, standard time, estimated step time and work code fields.
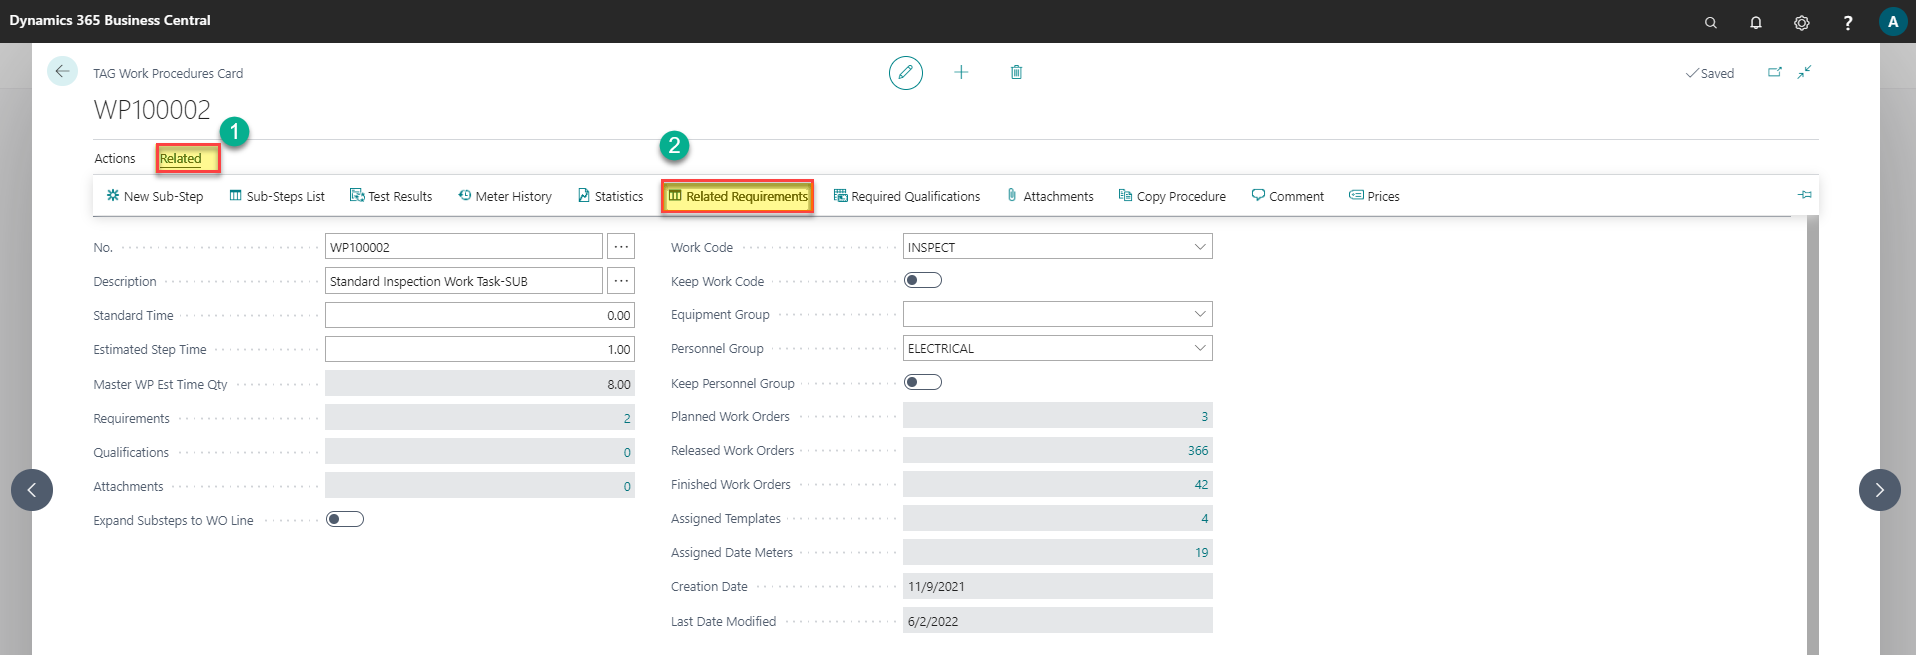
- On the Navigate tab, click on the "Related Requirements" button to enter work procedure related requirements.
- Select the related requirement type (Item, Consumable, OSP, Other or Parts) :
- Click on the "No. field" to open the related requirement list (Item):
- Click "Ok" to select the item and validate.
- Select the expected quantity and expected unit cost that are expected to be used of the item.
- Note: Other types of related requirement may be set for the Work Order task by selecting the type and no. on a new line (Consumable, Resource, Tool, OSP, Others and Parts).

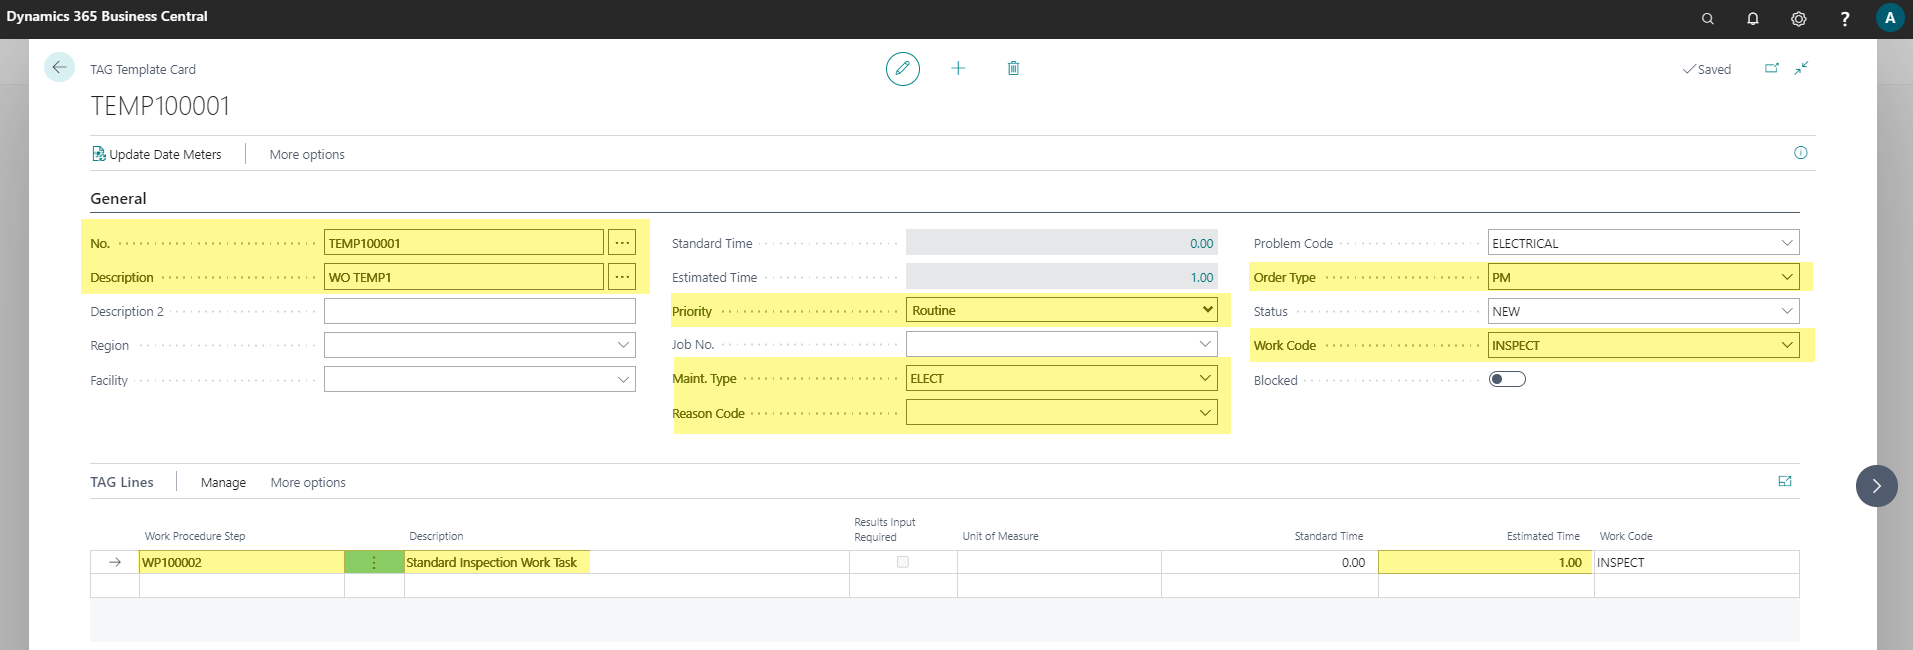
TAG Templates
- TAG Plan Note: TAG plan must be = CMMS or EAM in order to create templates. Templates are not created with TAG Initialize Data.
The following steps allow you to create a new Template:
- In the TAG Planning Menu, click on the TAG Template to open the TAG Template list:
- Click on the "New" button on the ribbon to create a new template:
- On the General FastTab, enter No, description, priority, maint type and all desired fields.
- On the line sub menu, click on the "Related Requirements" button to enter the related requirements.
- Select the related requirement type (Item, Consumable, OSP, Other or Parts) :
- Click on the "No. field" to open the related requirement list (Item):
- Click "Ok" to select the item and validate.
- Select the expected quantity and expected unit cost that are expected to be used of the item.


- Note: Work procedure, templates → these are tools used by the user to quickly populate Work Order header and lines with pre-defined values
Preventive Maintenance : Date meter policies
Create new Date Meter Policy (DMP)
- Note: The below descriptive steps assume that Data Initialization was run and therefore master file data exists in the database. (equipment, personnel, codes)
- Start from TAG Maint. Manager Role Center Profile.
- Go to the TAG Planning section and click on the TAG Date Meter Policies Menu.
- Click on New button on the ribbon.
- Tab over the No. field to click on the description field and let TAG assign automatically a record No.
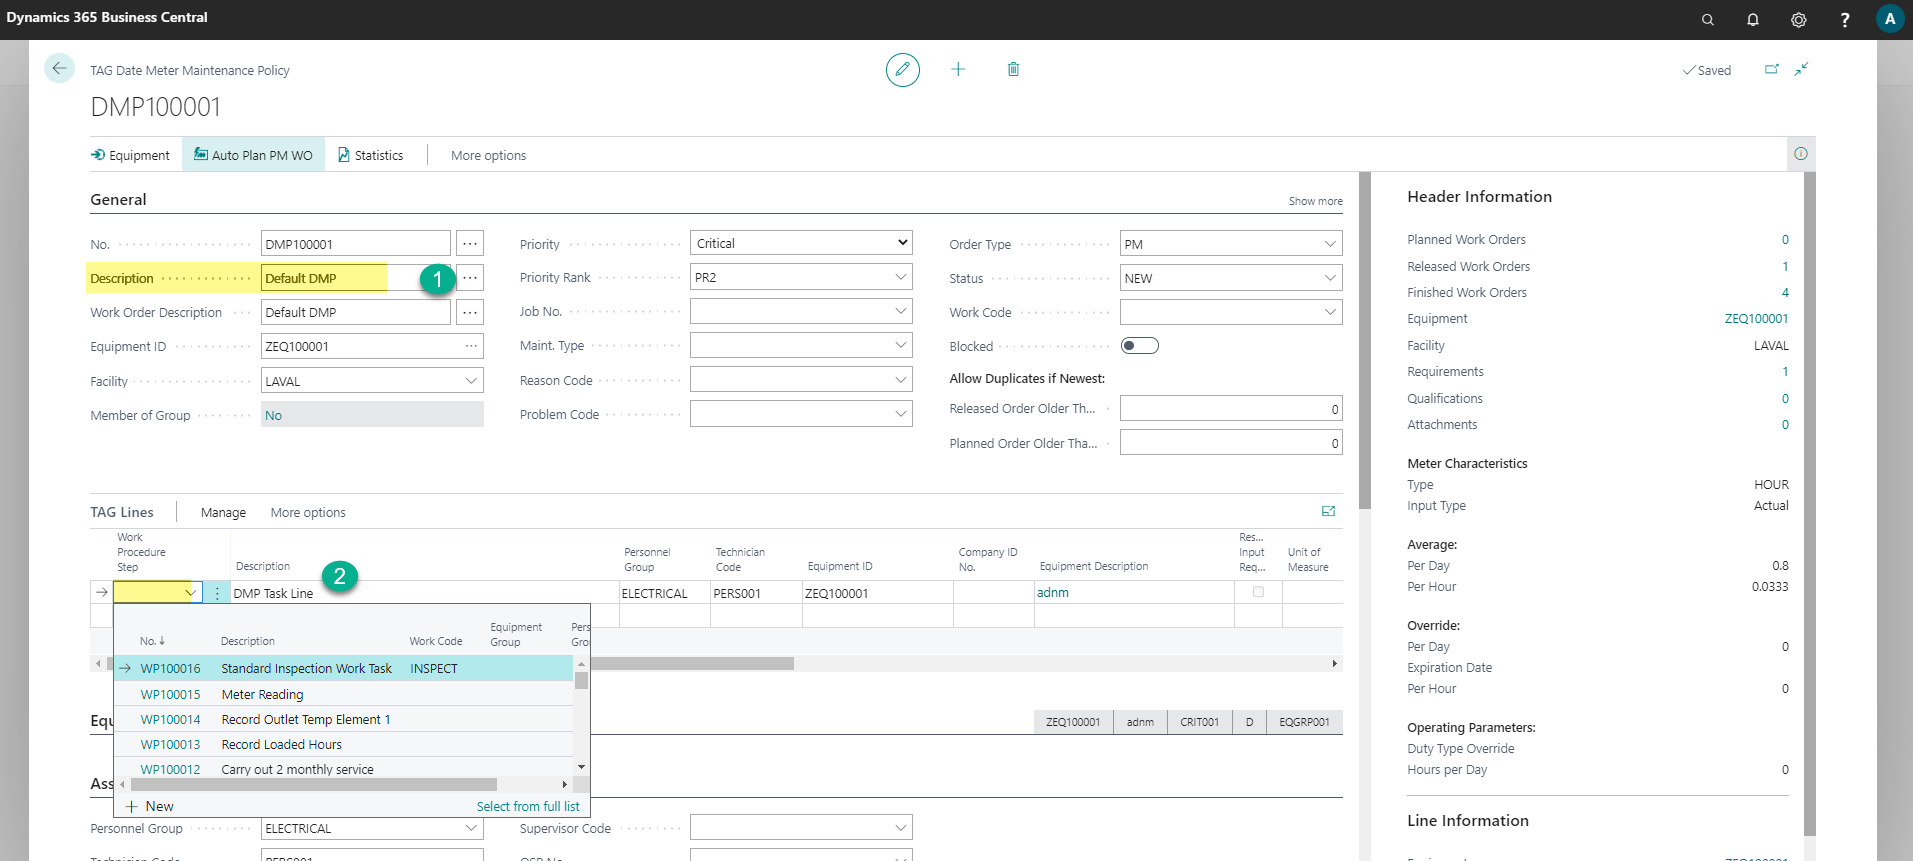
- In the General FastTab enter the Description, Equipment ID, Order Type and other desired fields.
- Open the Line section, either select a work procedure or enter a description task line manually.
- In the Schedule FastTab set technician code and update to lines
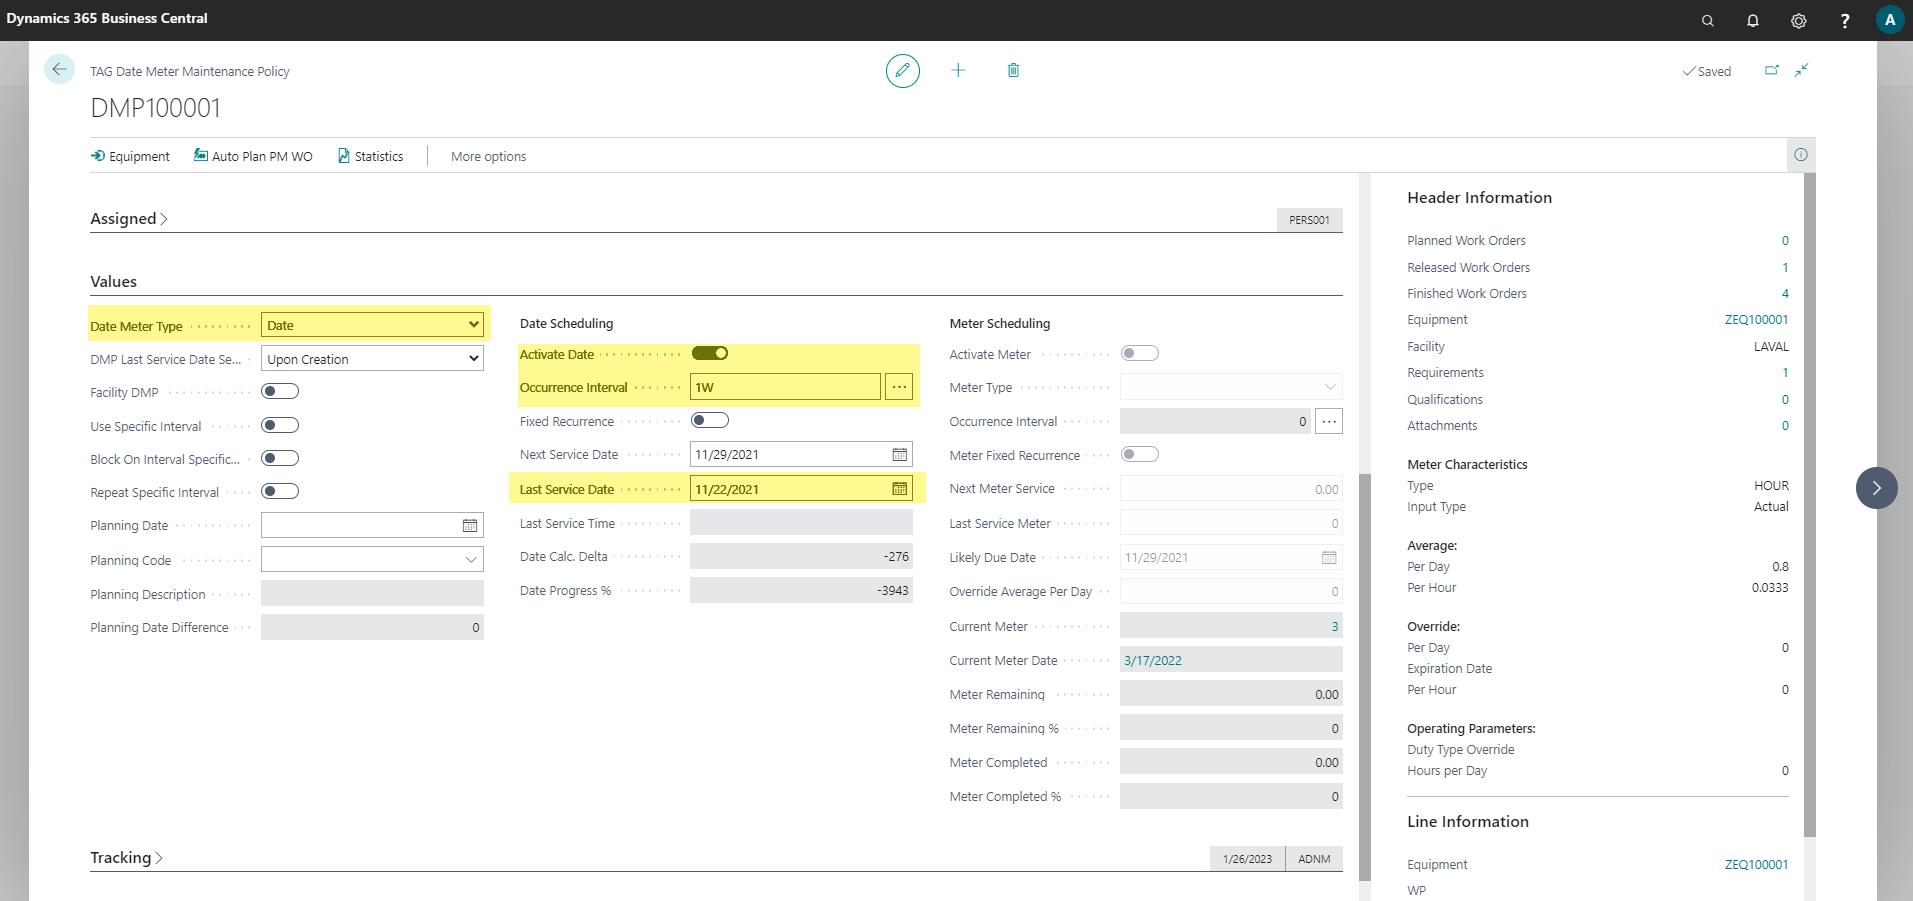
- In Values FastTab
- Select Date as Date Meter Type,
- Enter occurrence interval (1D, 1W or 1M)
- Enter a date in the field "Last service Date" (pick a date in the past)
- Set Activate Date check box to yes
Expected result:
- A Date Meter Policy record with DMP line setup for date trigger
- In the values field "next service date" should have a value based on the combination of last service date and occurrence interval
Steps:

Preventative Maintenance:
Steps to create a PM WO from DMP and Complete
- Note: The below descriptive steps assume that Data Initialization was run and therefore master file data exists in the database. (equipment, personnel, codes)
- Note: the default values for PM WO generation are setup on the TAG Controls page, Preventative Date Meter Setup FastTab.
The below steps assume that these are the values in use.
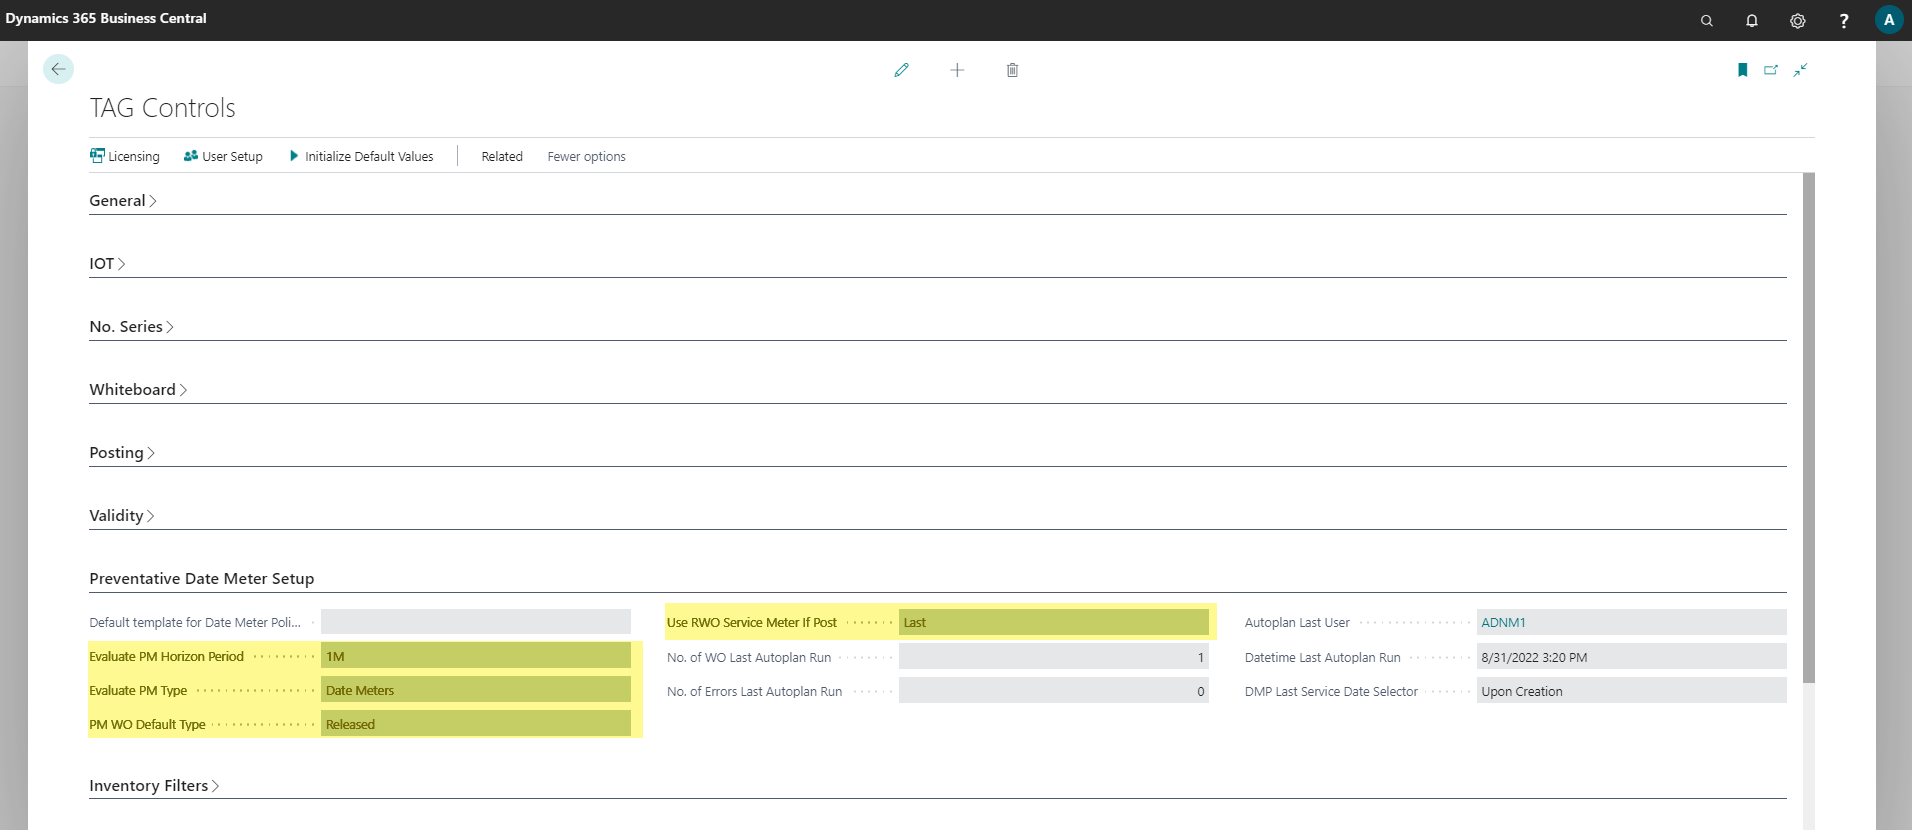
Steps to create a Preventative Maintenance WO from DMP record and Complete
AutoPlan from DMP Card
Start from TAG Maint. Manager Role Center Profile.
Go to the TAG Planning section and click on the TAG Date Meter Policies Menu.
- Select a Date Meter Policy Record (DMP) and open the card.
Go to the General FastTab and confirm:
- Description has a value
- Equipment ID has a value
Go to the Lines FastTab and confirm:
- A DMP line exists with description and technician code
Go to the Schedule FastTab and confirm:
- A technician is assigned to the DMP
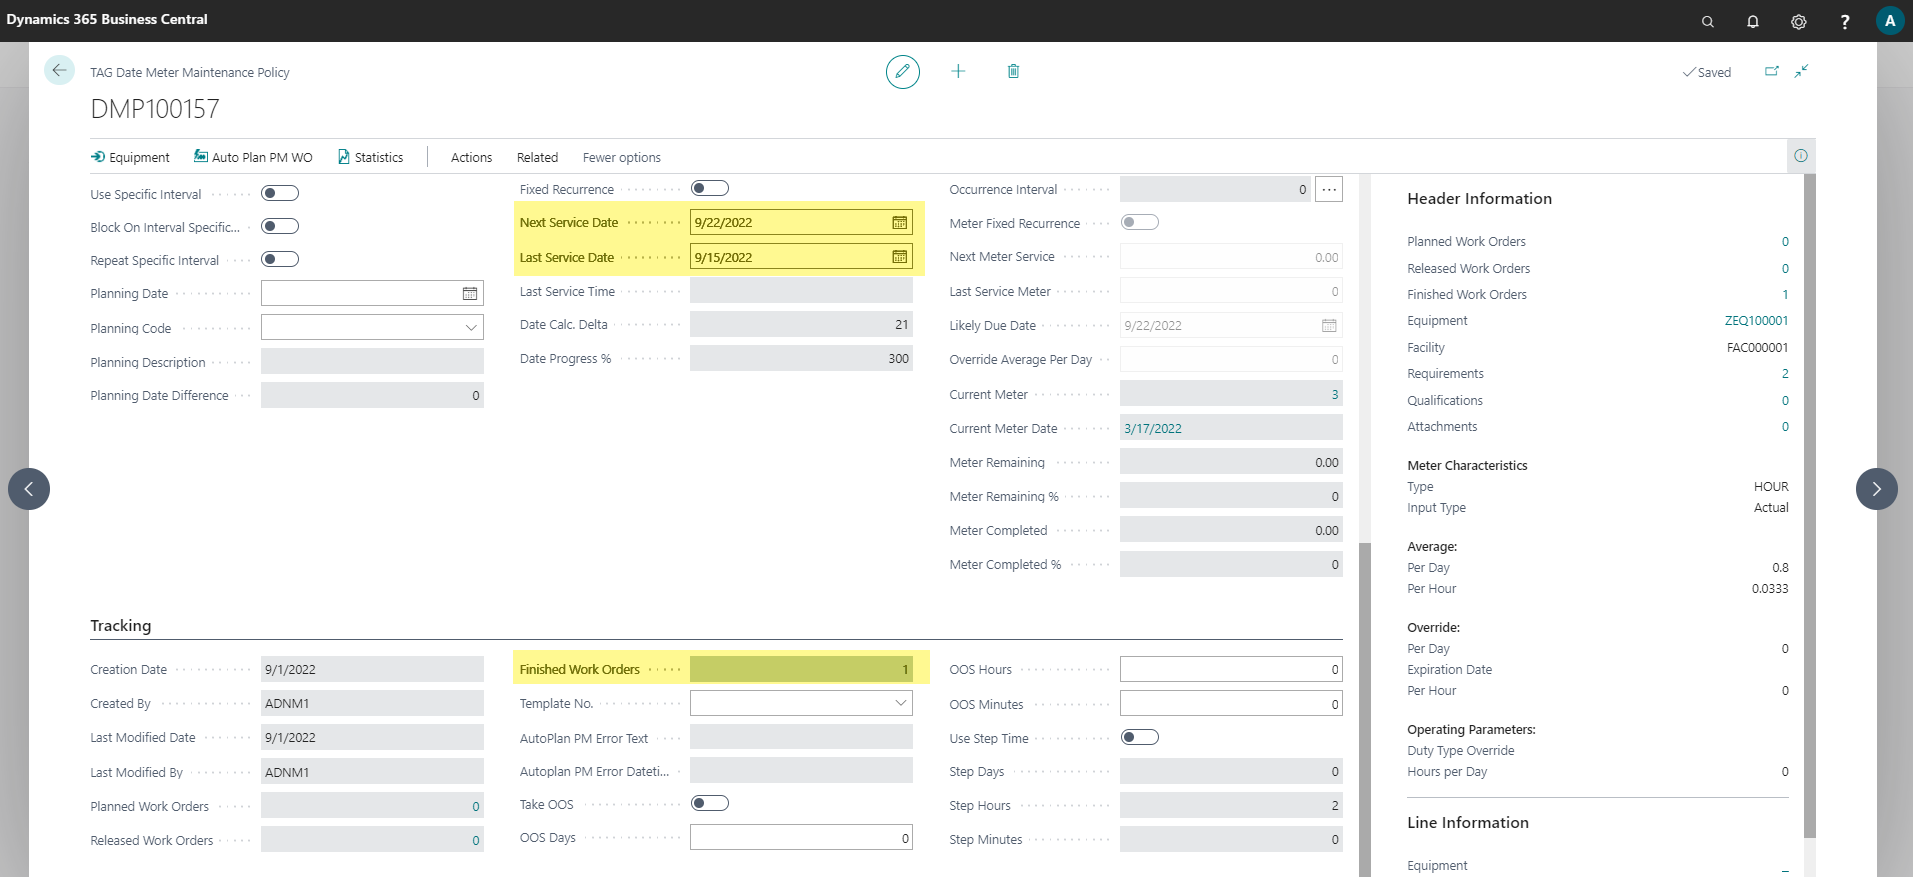
Go to the Values FastTab and confirm:
- Type = Date
- Activate Date = yes
- Occurrence interval has a value
- Last service date has a value
- Next service date has a value
Go to Tracking FastTab on the target DMP card . Check field "Released WO" to confirm a WO does not exist for this DMP.(the fields are a flow field to the WO list)
- Note: If a WO does exist, resolve by Completing or Deleting the record.
- If a WO does not exist, proceed to autoplan
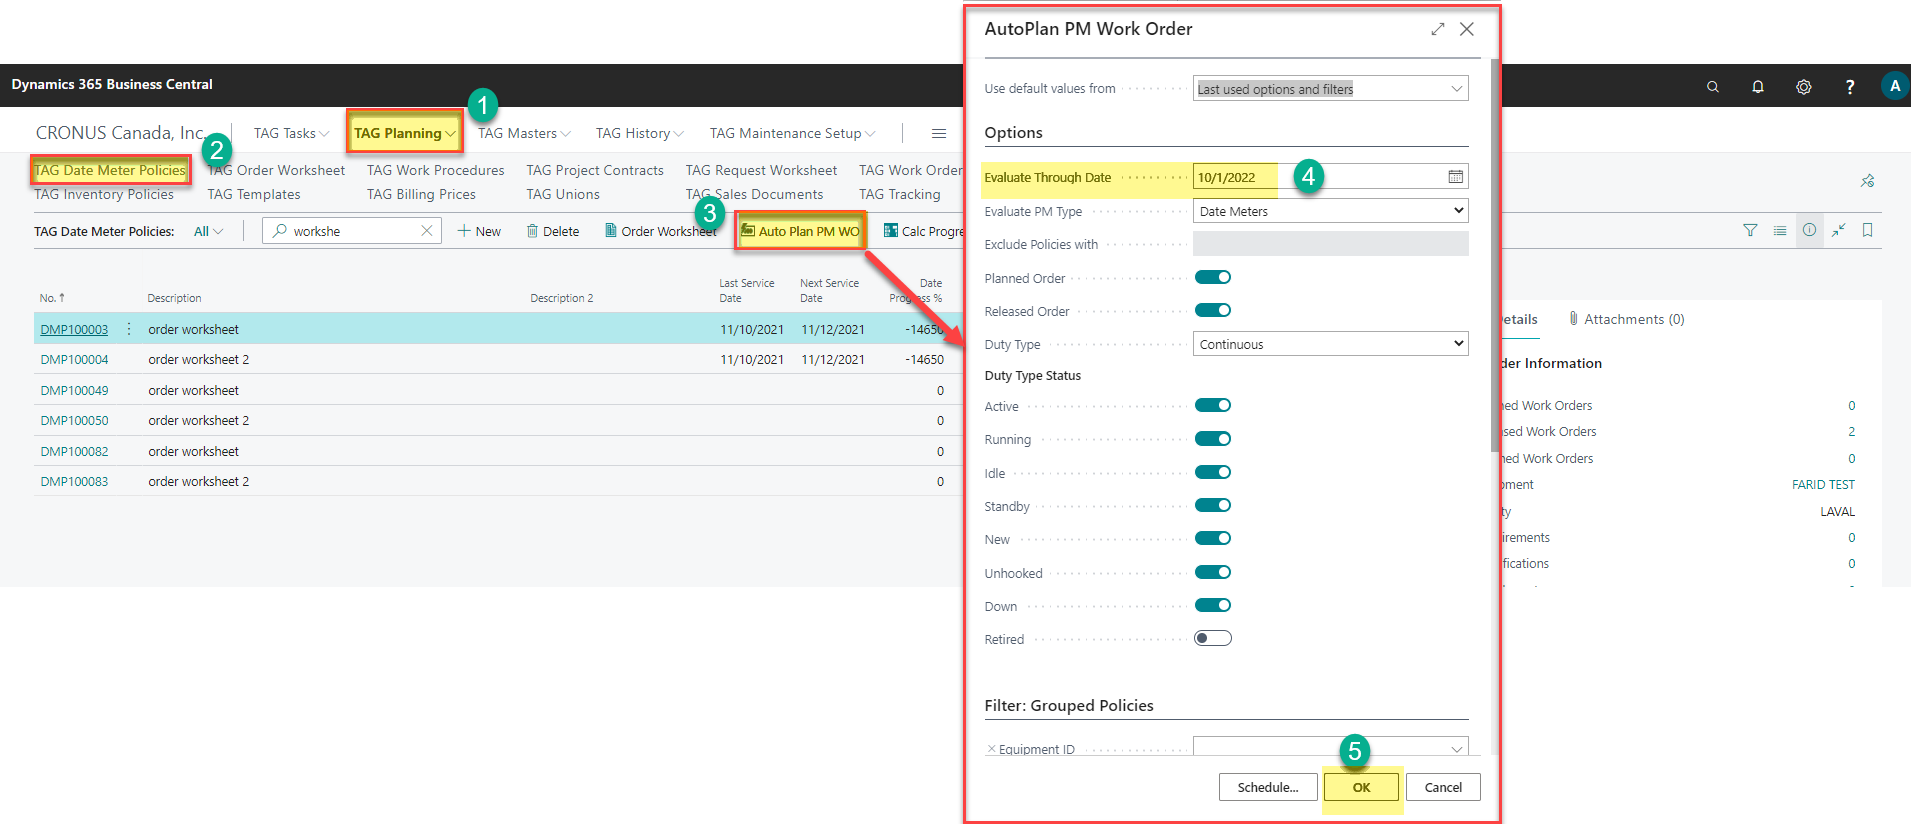
On the ribbon for the DMP card click on action button "Autoplan PM WO"
- On Autoplan PM WO dialogue box check that
- The policy No is the same as your target DMP
- The evaluate through date is later than next service date on the DMP
- Evaluate PM type = Date Meters
- Click "Ok" on the Autoplan PM WO dialogue box
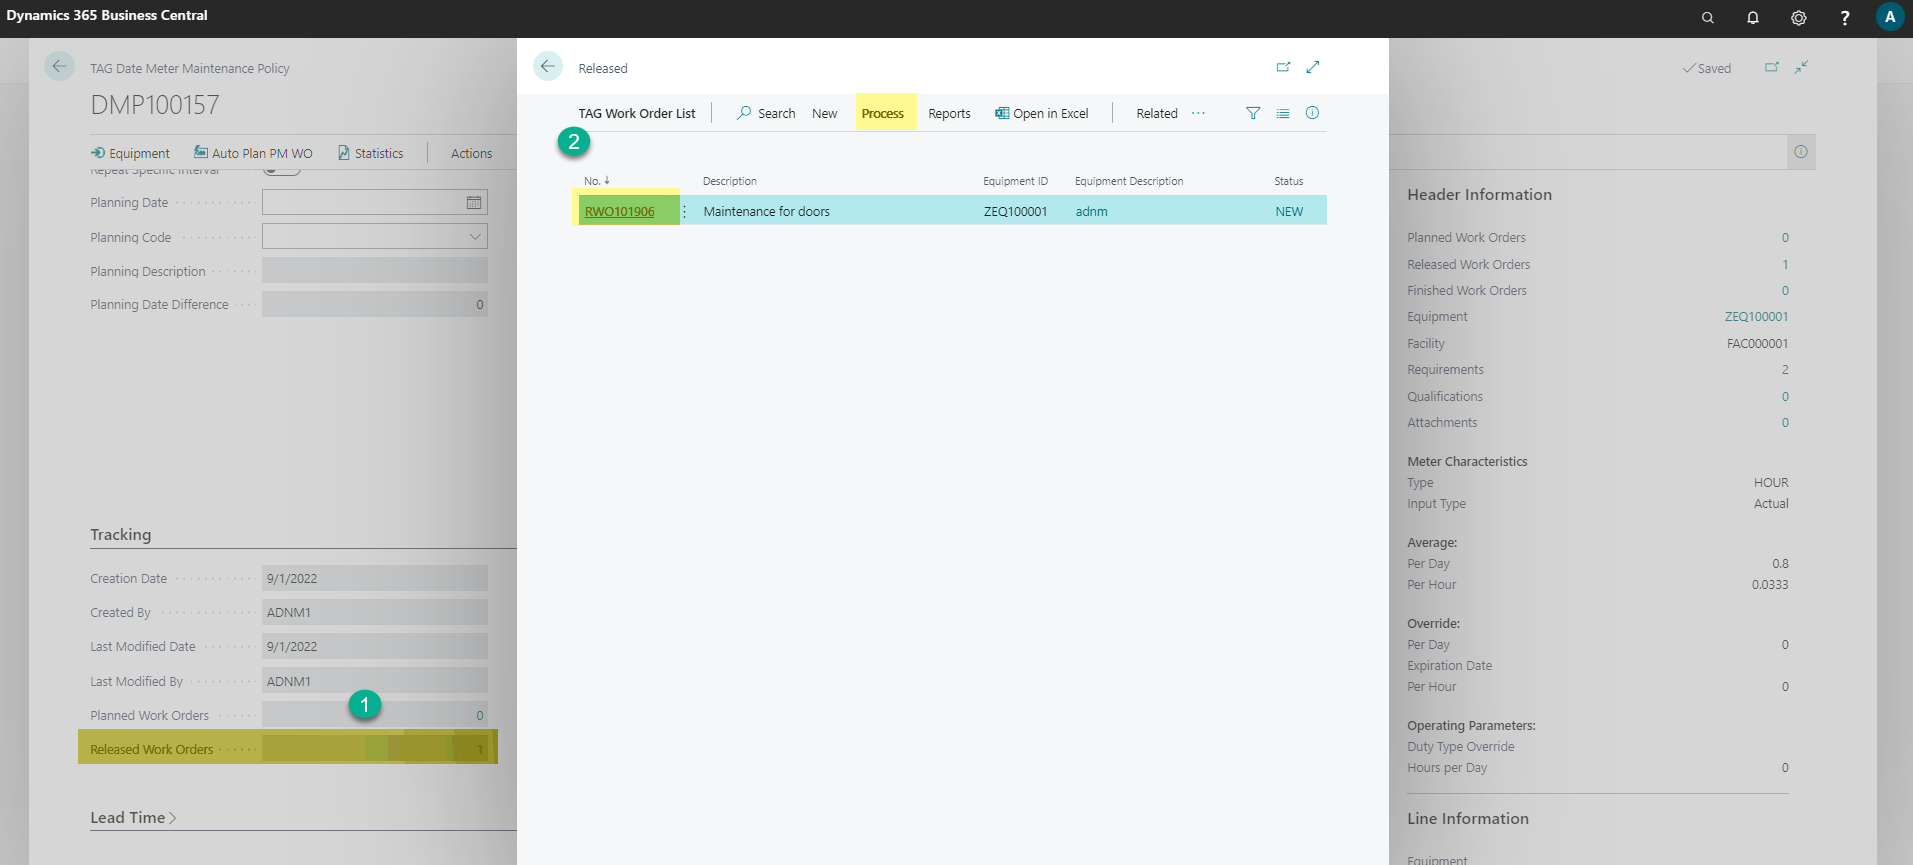
A message will show indicating that a Work Order has been created. Default configuration is a Released Work Order.
Return to the Tracking FastTab on the target DMP record and refresh the page. Check "Released WO field" to confirm a WO now exists for this DMP record. (the fields are a flow field to the WO list)
Drill into the WO list and open the WO card specific to the DMP
- The description and equipment should be the same as the source DMP
- In Tracking FastTab the field Policy no should be the same as the source DMP
Complete the Released WO by clicking action button "Complete" in the WO ribbon.
- This action will delete the RWO and create a FWO
- This action will update the DMP field "Last service date" from the completed RWO
- Update of the last service date will calculate the next service date on the DMP.
Return to the target DMP record
- Scroll down to the Values FastTab and confirm the last service date and next service date are updated
- Scroll down to the Tracking FastTab and confirm the finished Work Order
- Note: the above steps are designed to minimize validation errors. Alternative and more advanced setups can be configured for different results. Contact Verosoft for instructions.
- Note: if the message shows that 0 work orders were created, it means that the system calculates that the PM is not due. Some typical reasons:
- Activate Date on the DMP = no or Blocked = yes
- To resolve change the field values on the DMP
- A PWO or RWO Work Order already exists for that DMP
- To resolve you can go to Tracking FastTab as described and complete or delete the WO found.
- The target DMP equipment field values do not match the dialogue box filters
- Open the DMP Equipment
- Check that the equipment fields Duty Type and Duty Status are as expected.


Preventive Work Order (PM)
Alternative PM generation methods
AutoPlan PM Work Orders from DMP list:
- Start from TAG Maint. Manager Role Center Profile.
- Go to the TAG Planning section and click on the TAG Date Meter Policies menu.
- Click on AutoPlan PM WO button on the ribbon
- select the desired options (PM horizon period (evaluate through date) ….
- and click ok.
- PM Work Orders will be created similar to the single AutoPlan.
- Note that TAG AutoPlan PM Work Orders can be run from DMP list as a global PM process or can be run as a single PM from DMP card.
Steps: TAG AutoPlan – from DMP list
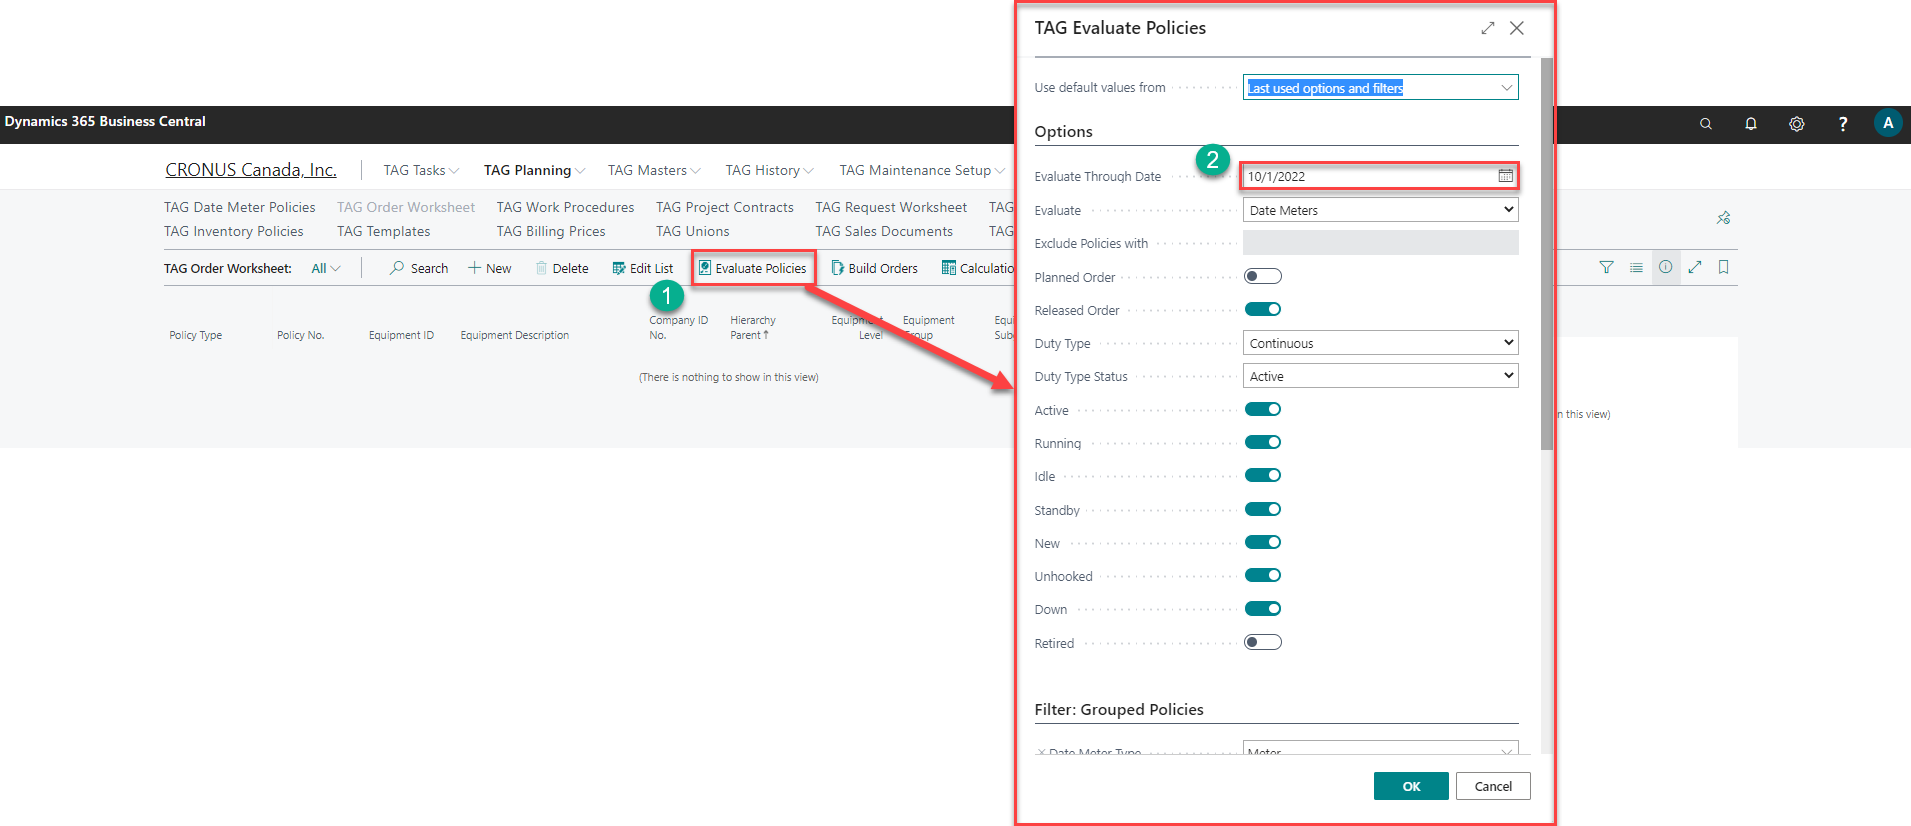
Plan PM WO from Order Worksheet:
- Start from TAG Maint. Manager Role Center Profile.
- Go to the TAG Planning section and click on the TAG Order Worksheet menu.
- Click on Evaluate Policies button on the ribbon, select the desired options (evaluate through date ….) and click "Ok".
- Once you get the PM suggestions, click on "Build Orders" button to create the related PM Work Orders
Steps:


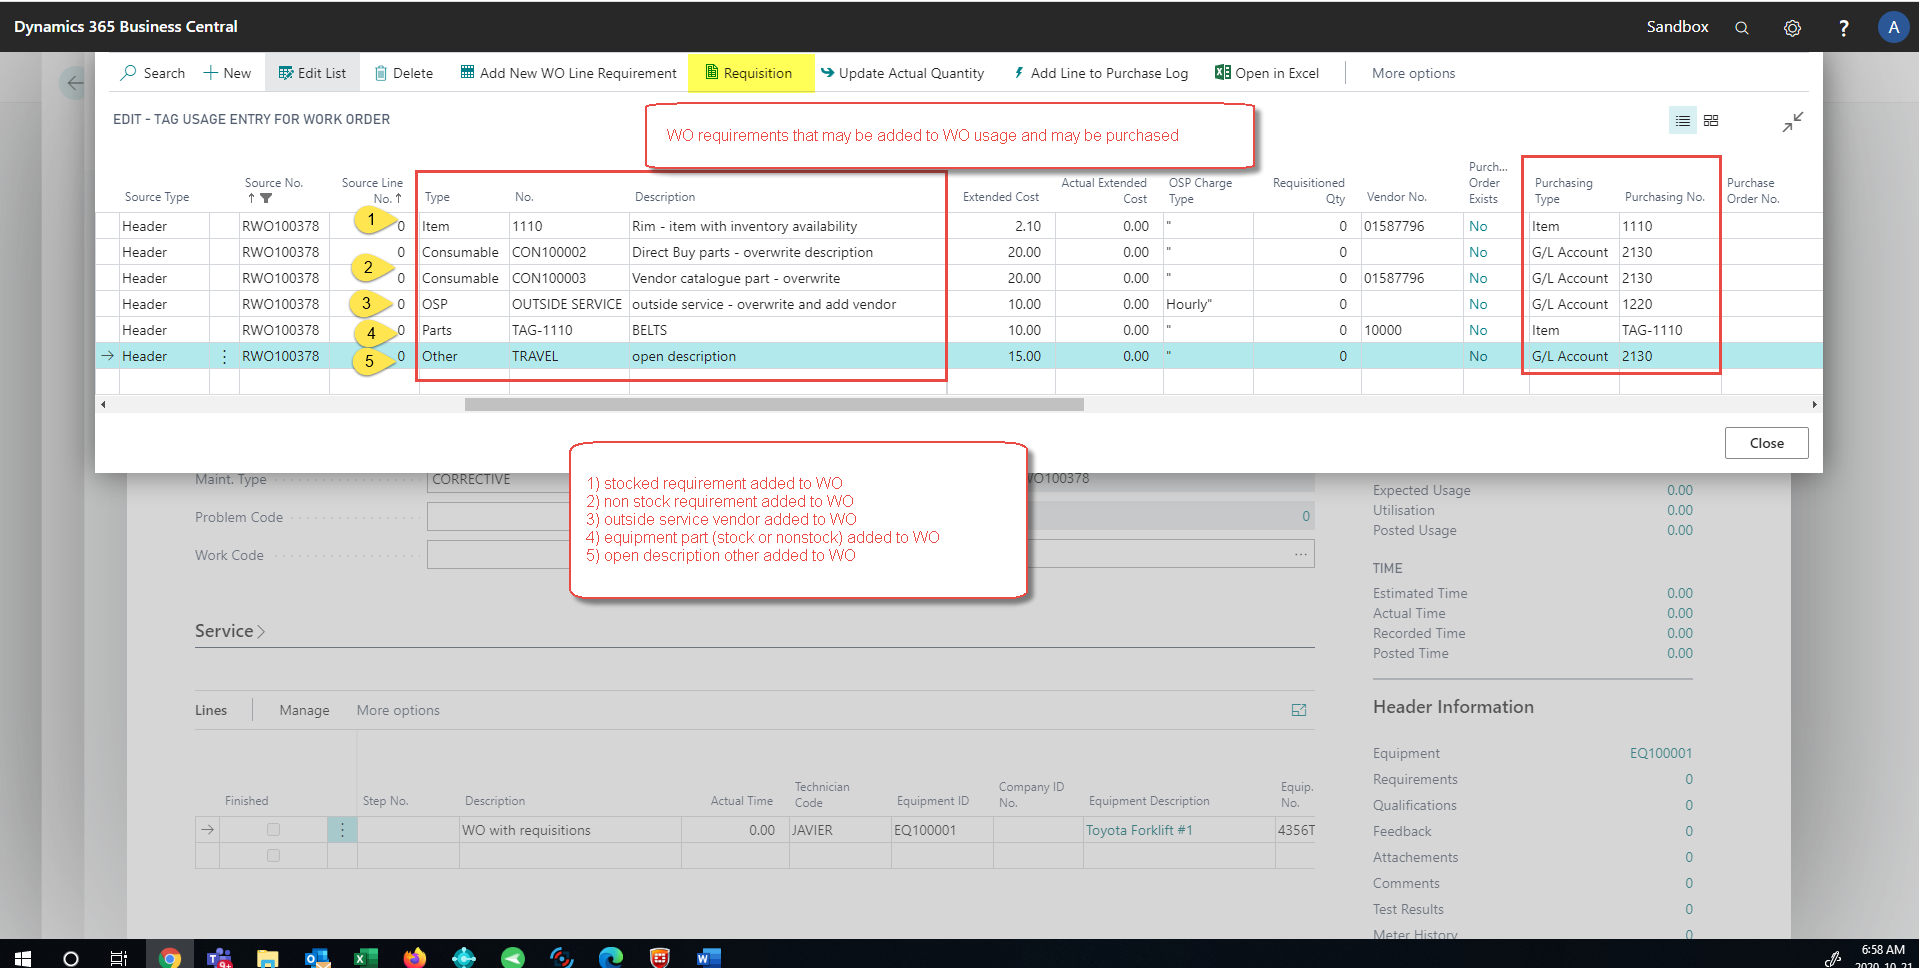
TAG Requisition & Purchase order
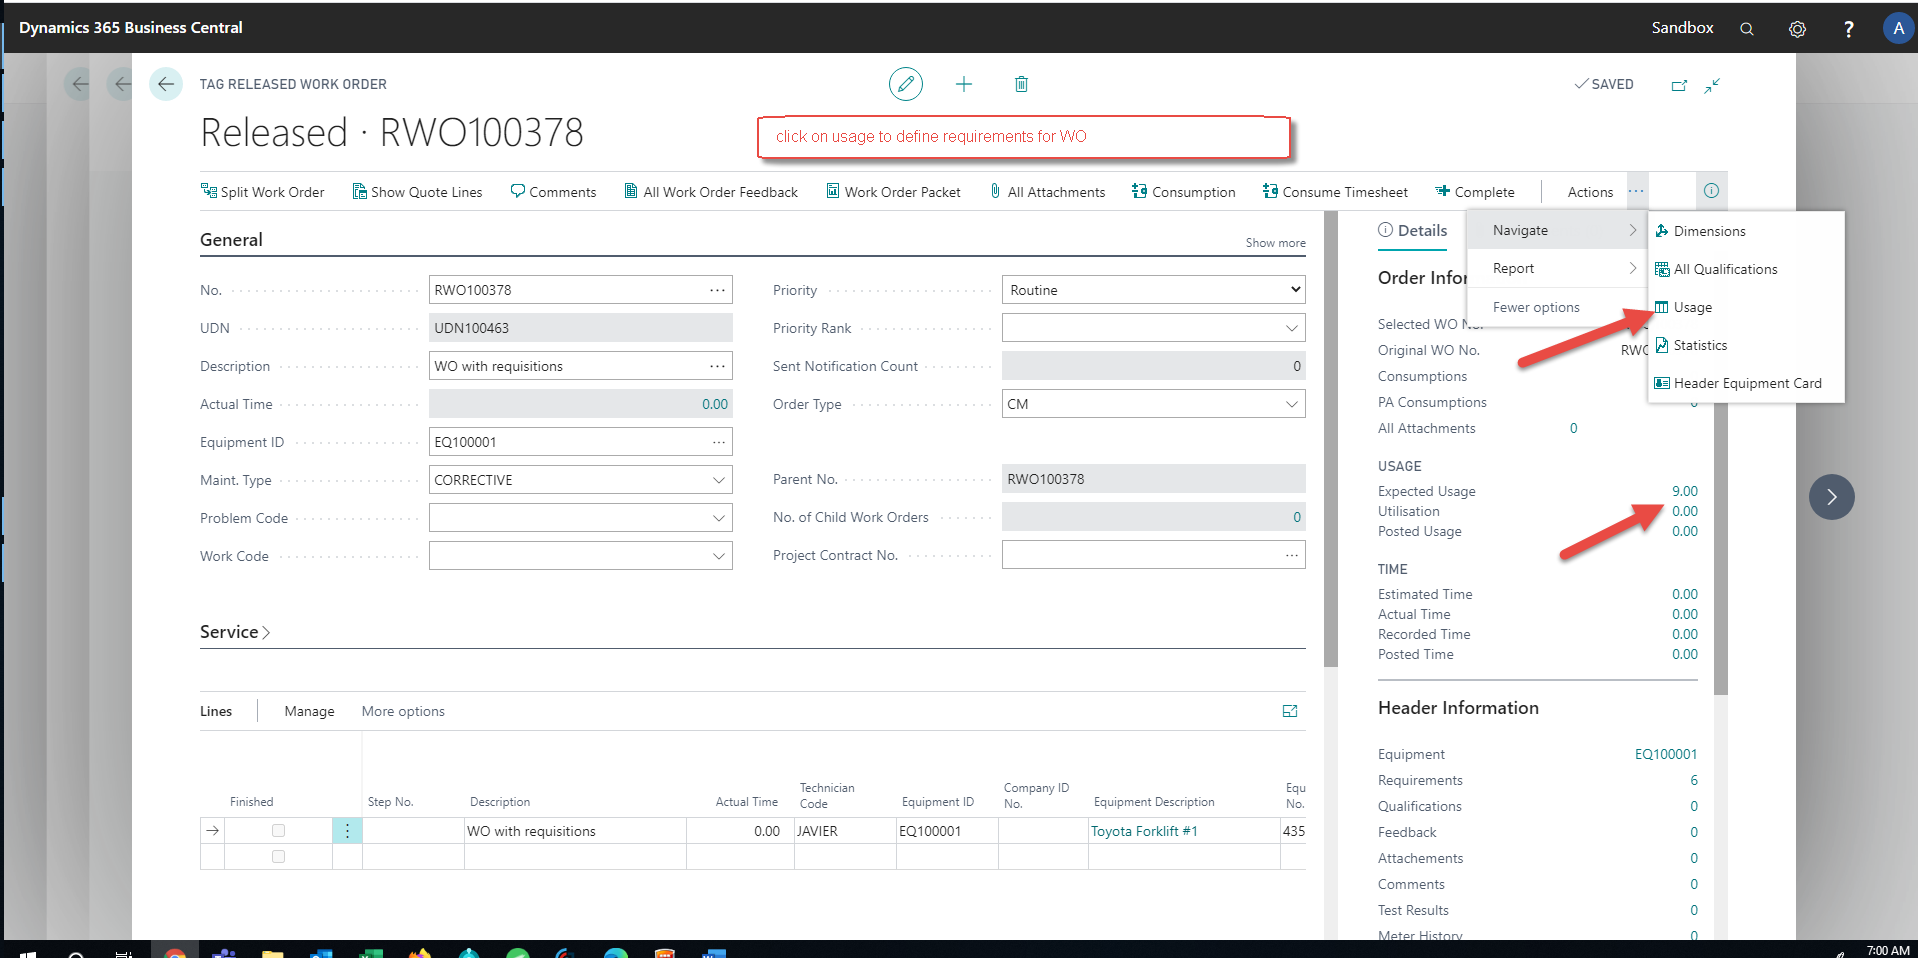
Place a stock requisition onto work order :
From role center --> Go to work order list --> Create work order and open
Select usage page Plan requirements on usage page
Can plan requirements by WO header or by WO line
Types of requirements
- Item – stocked part where inventory availability is adjusted by receipt, consumption, count (may be defined by location and bin)
- Consumable – direct buy catalogue part where inventory is not tracked – purchased to G/L account
- OSP – outside service vendor requirement - purchased to g/l account
- Parts – list of equipment parts that may be item or consumable
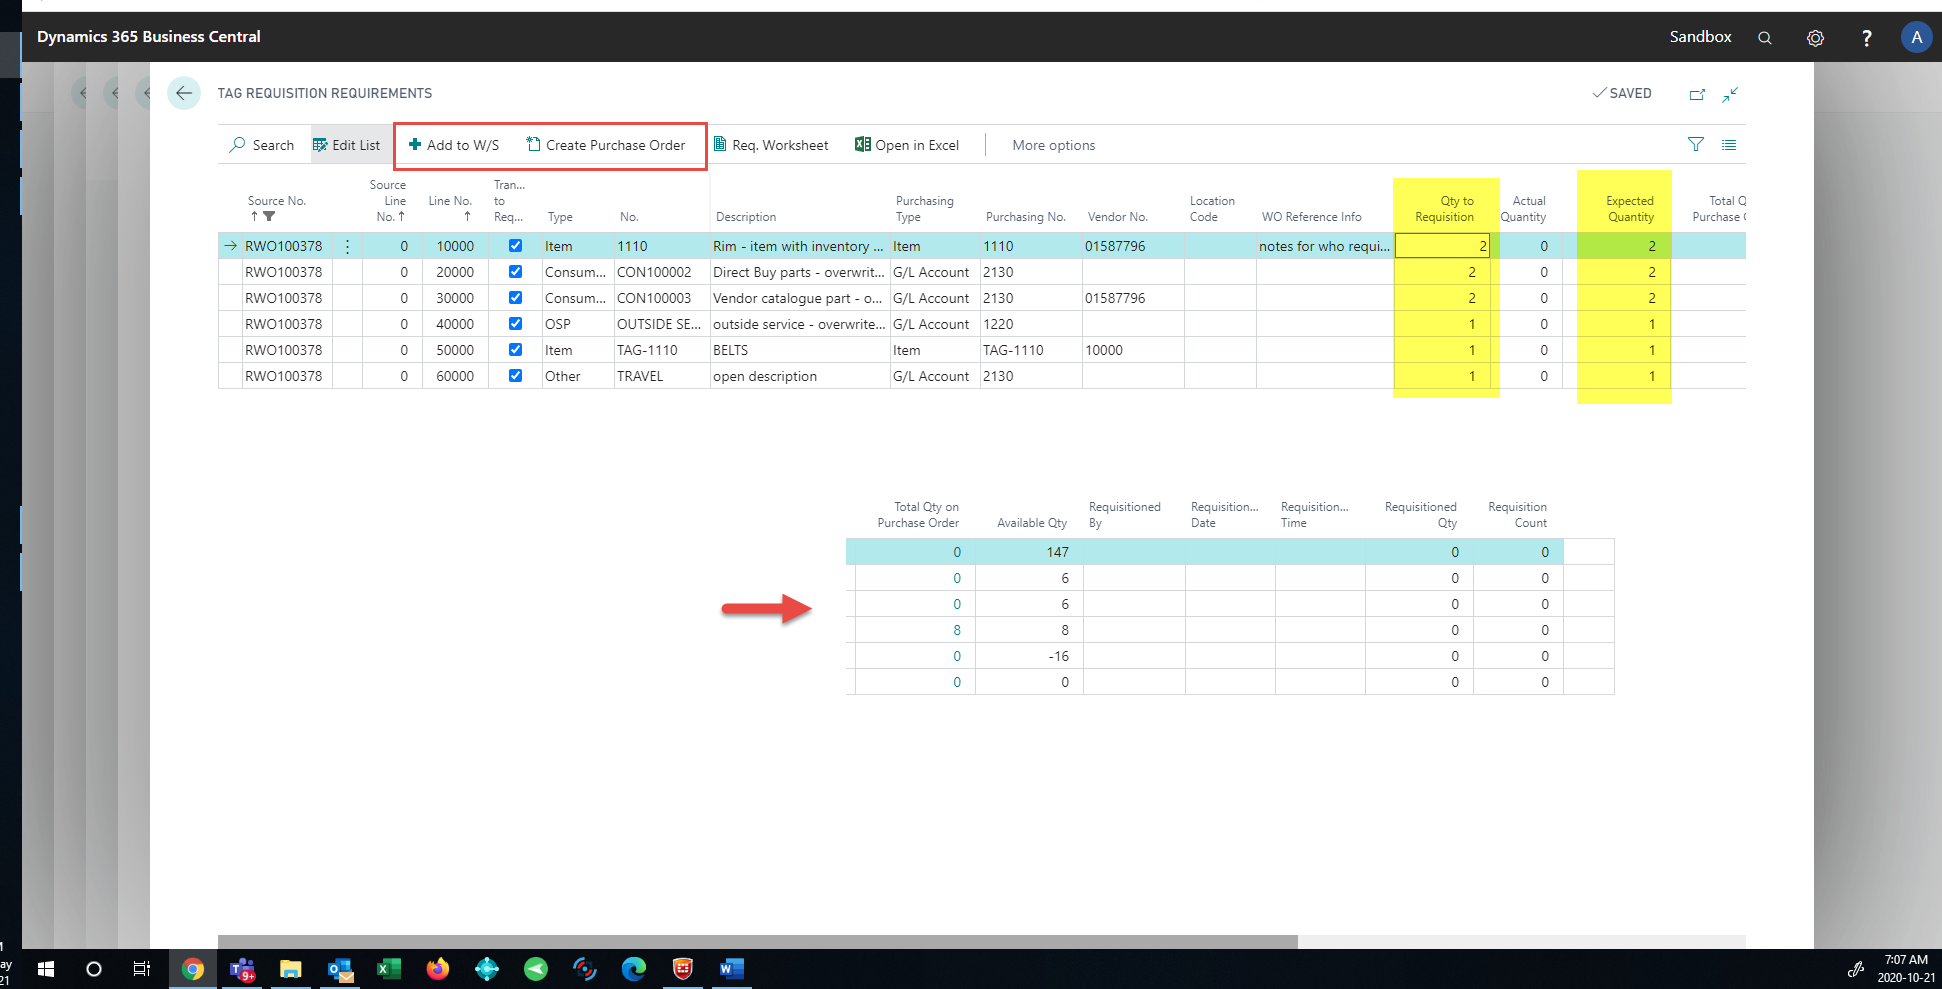
Click on requisition to:
- Directly create purchase order (if allowed by configuration)
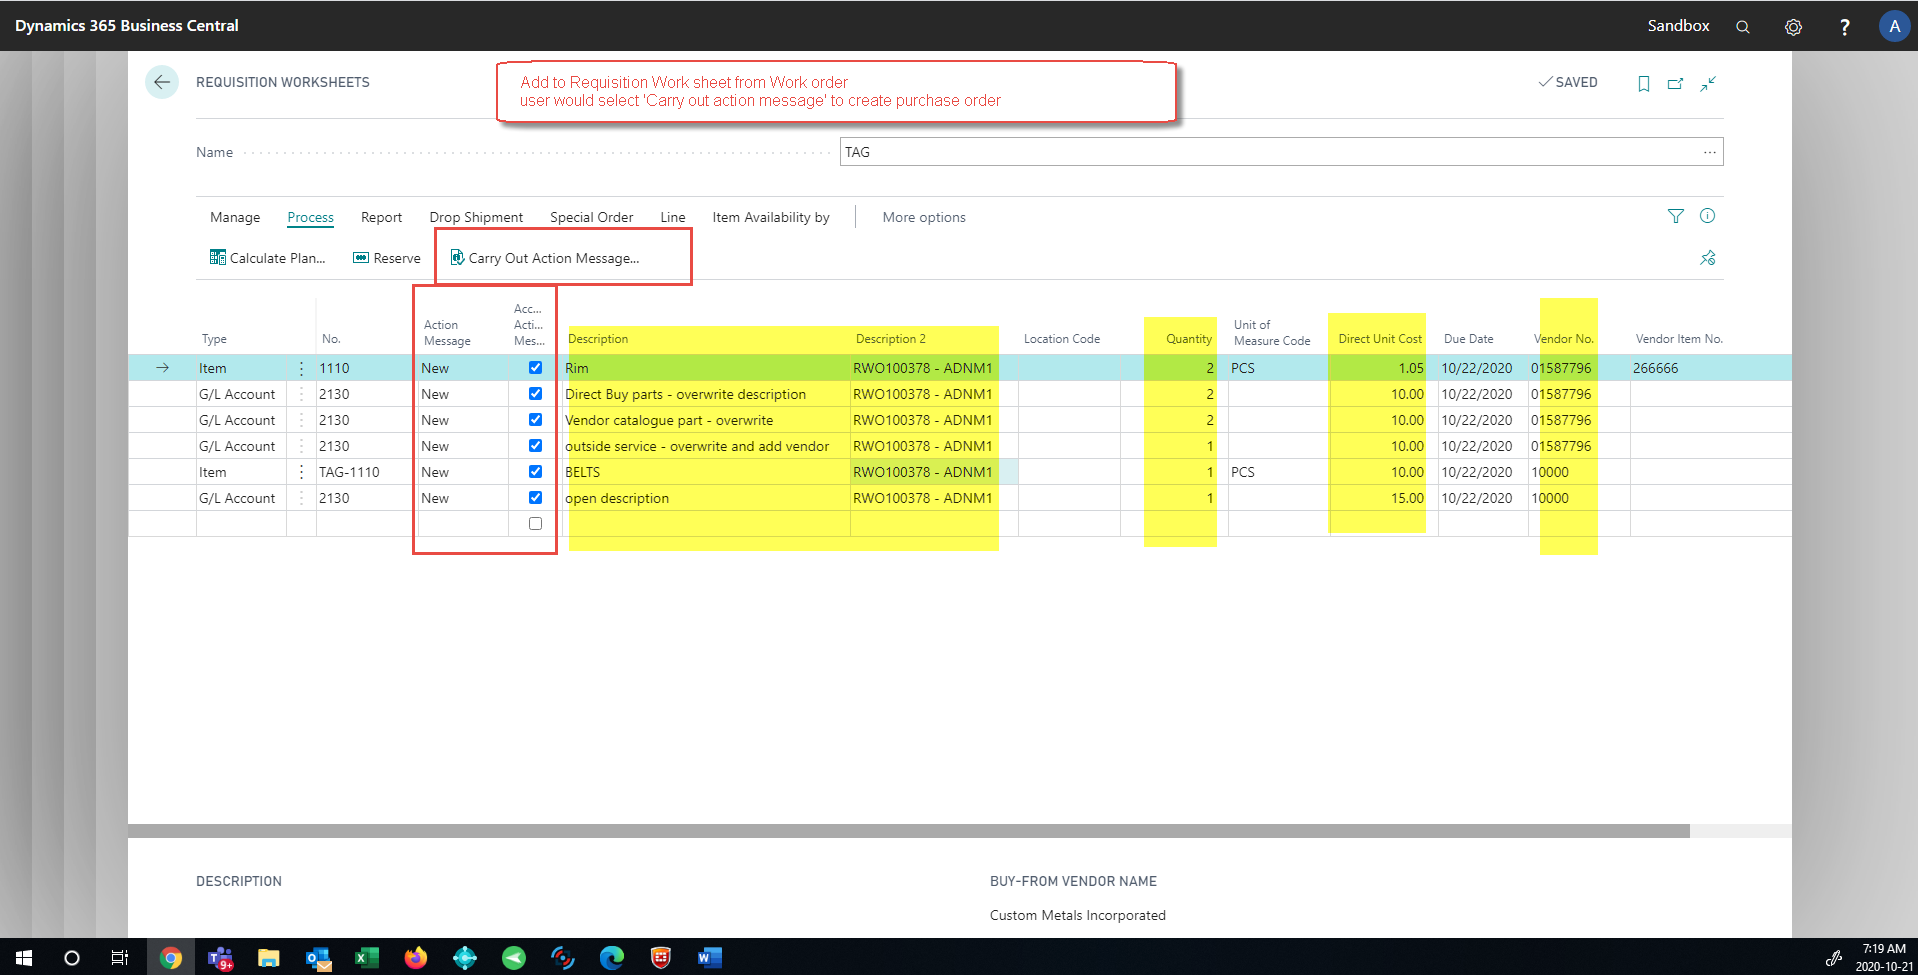
- Add to requisition worksheet for buyer/WH mgr to purchase
Add stock or non-stock manually to requisition worksheet
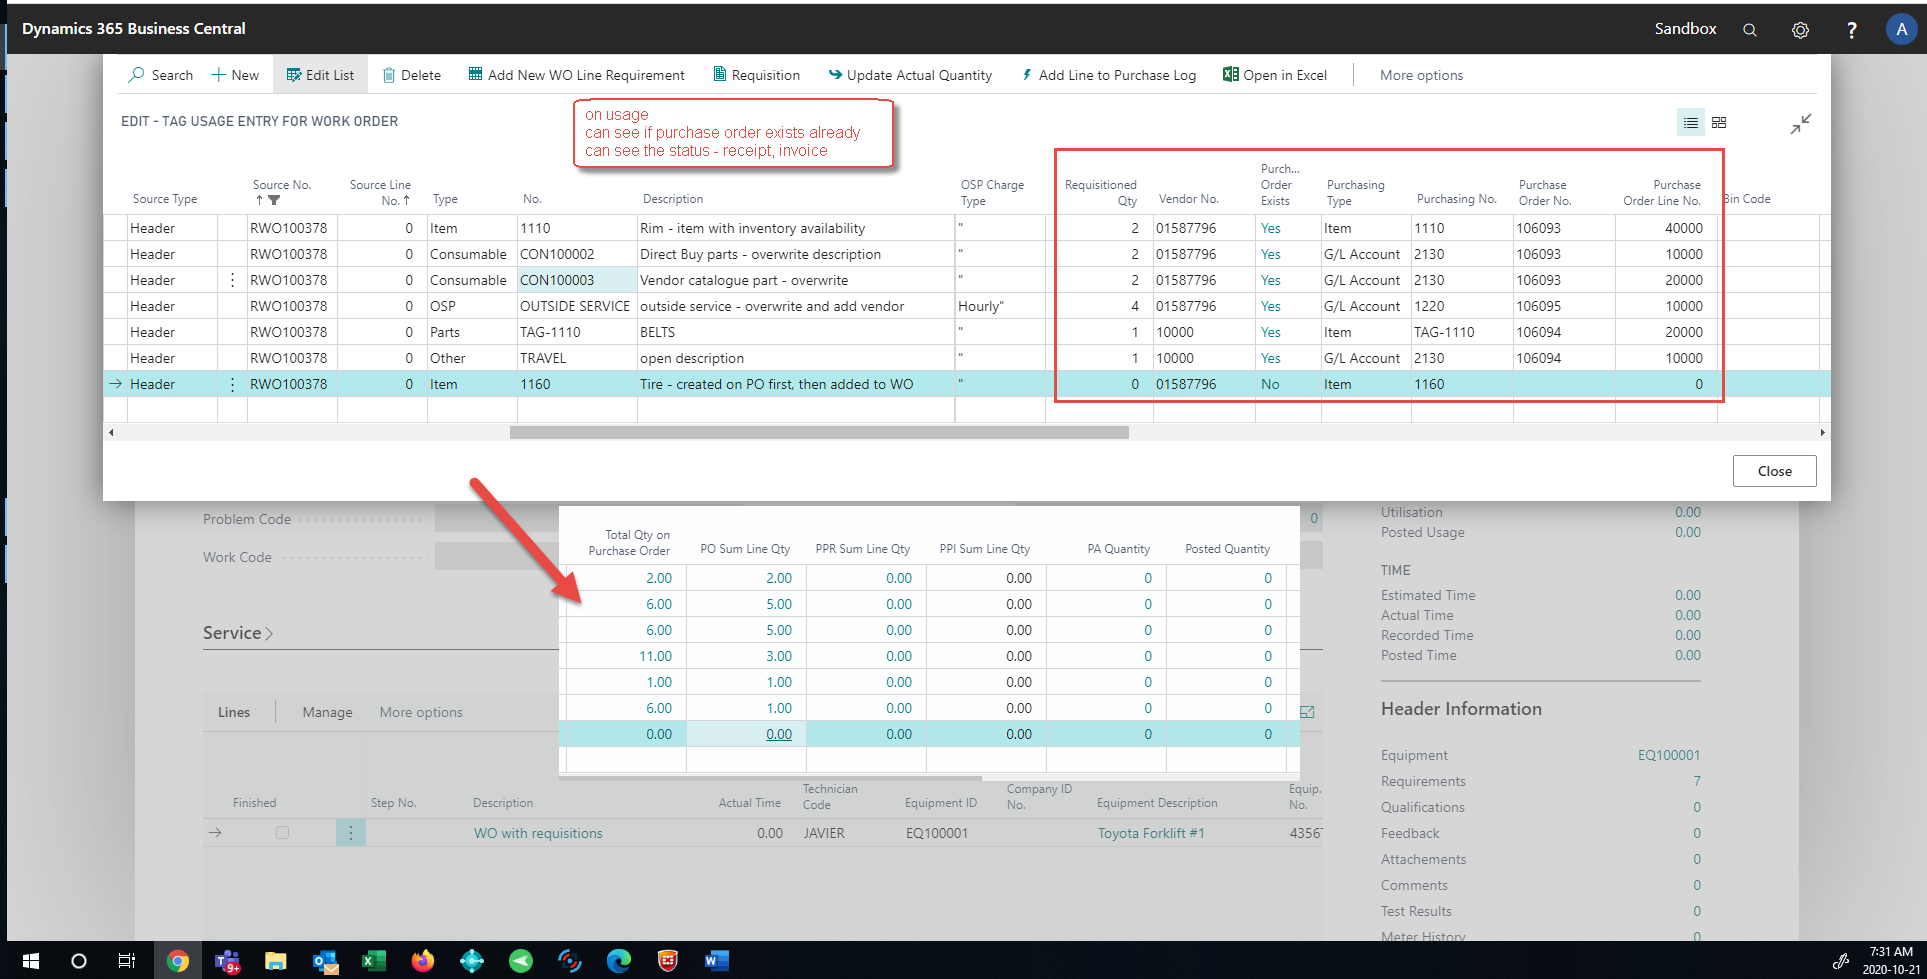
Go to purchase order to see result of requisition worksheet or create purchase order
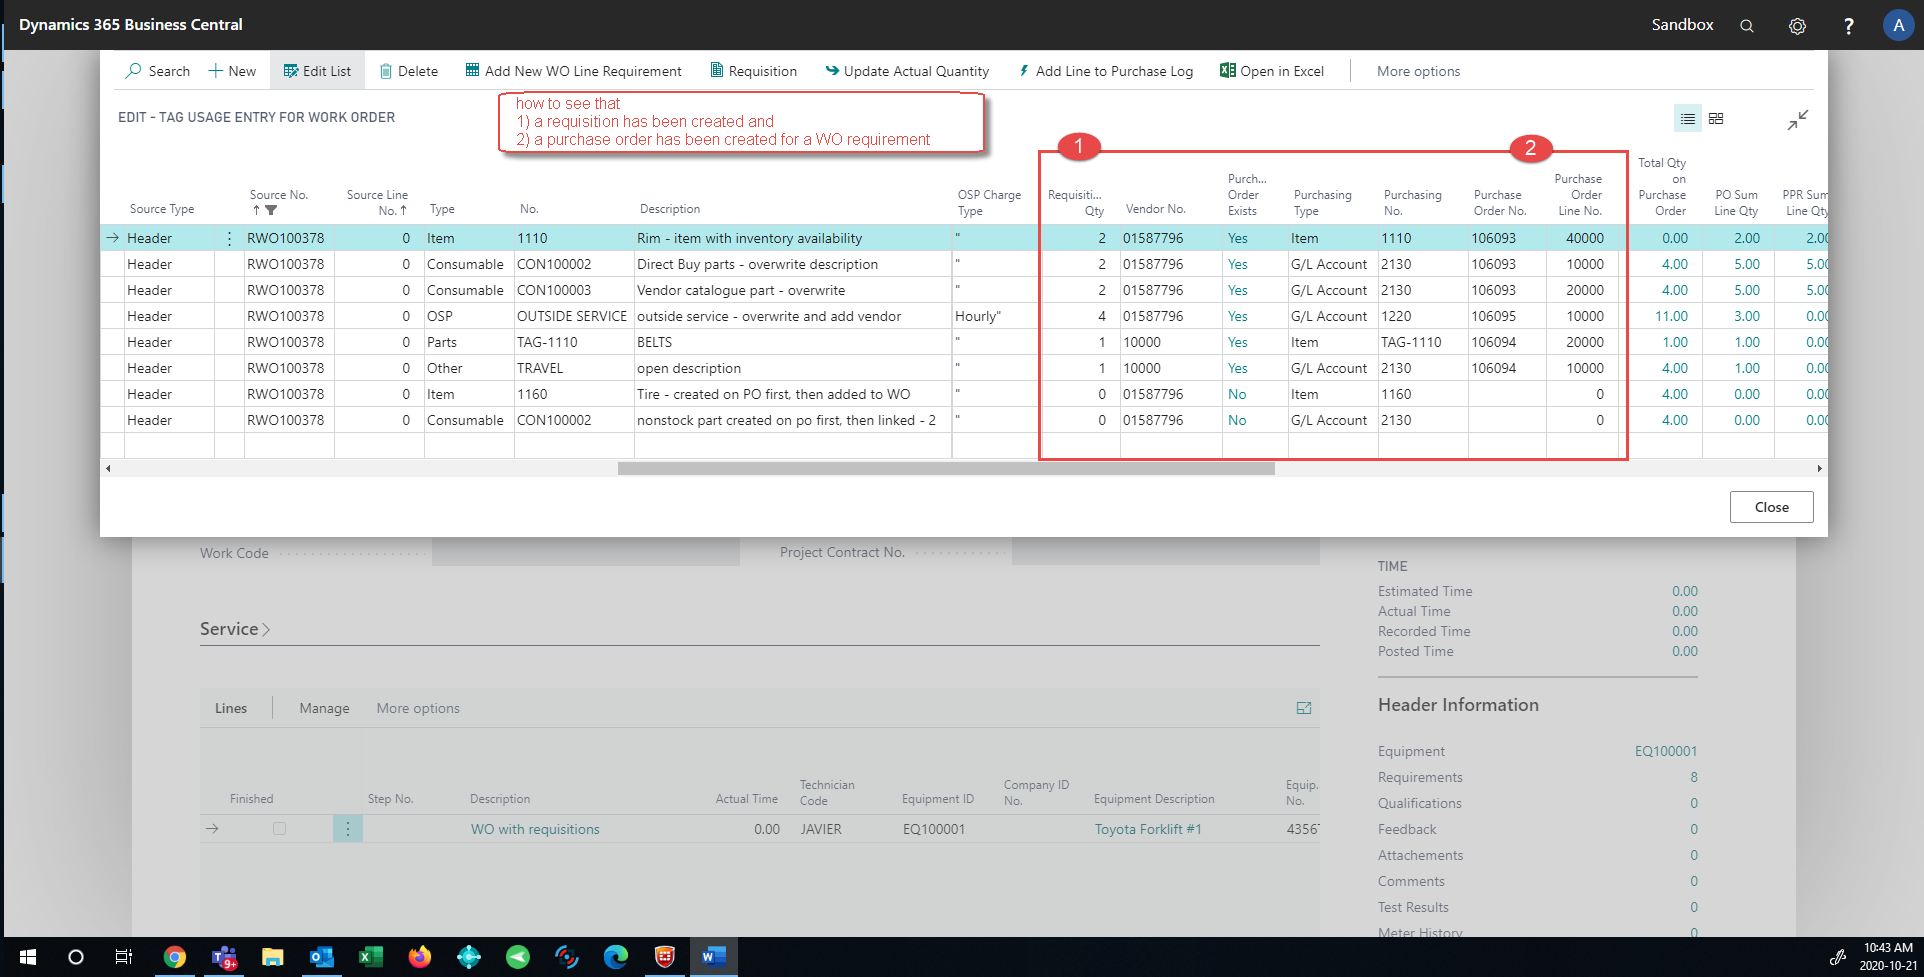
Go back to usage to see that the wo is linked to the purchase order
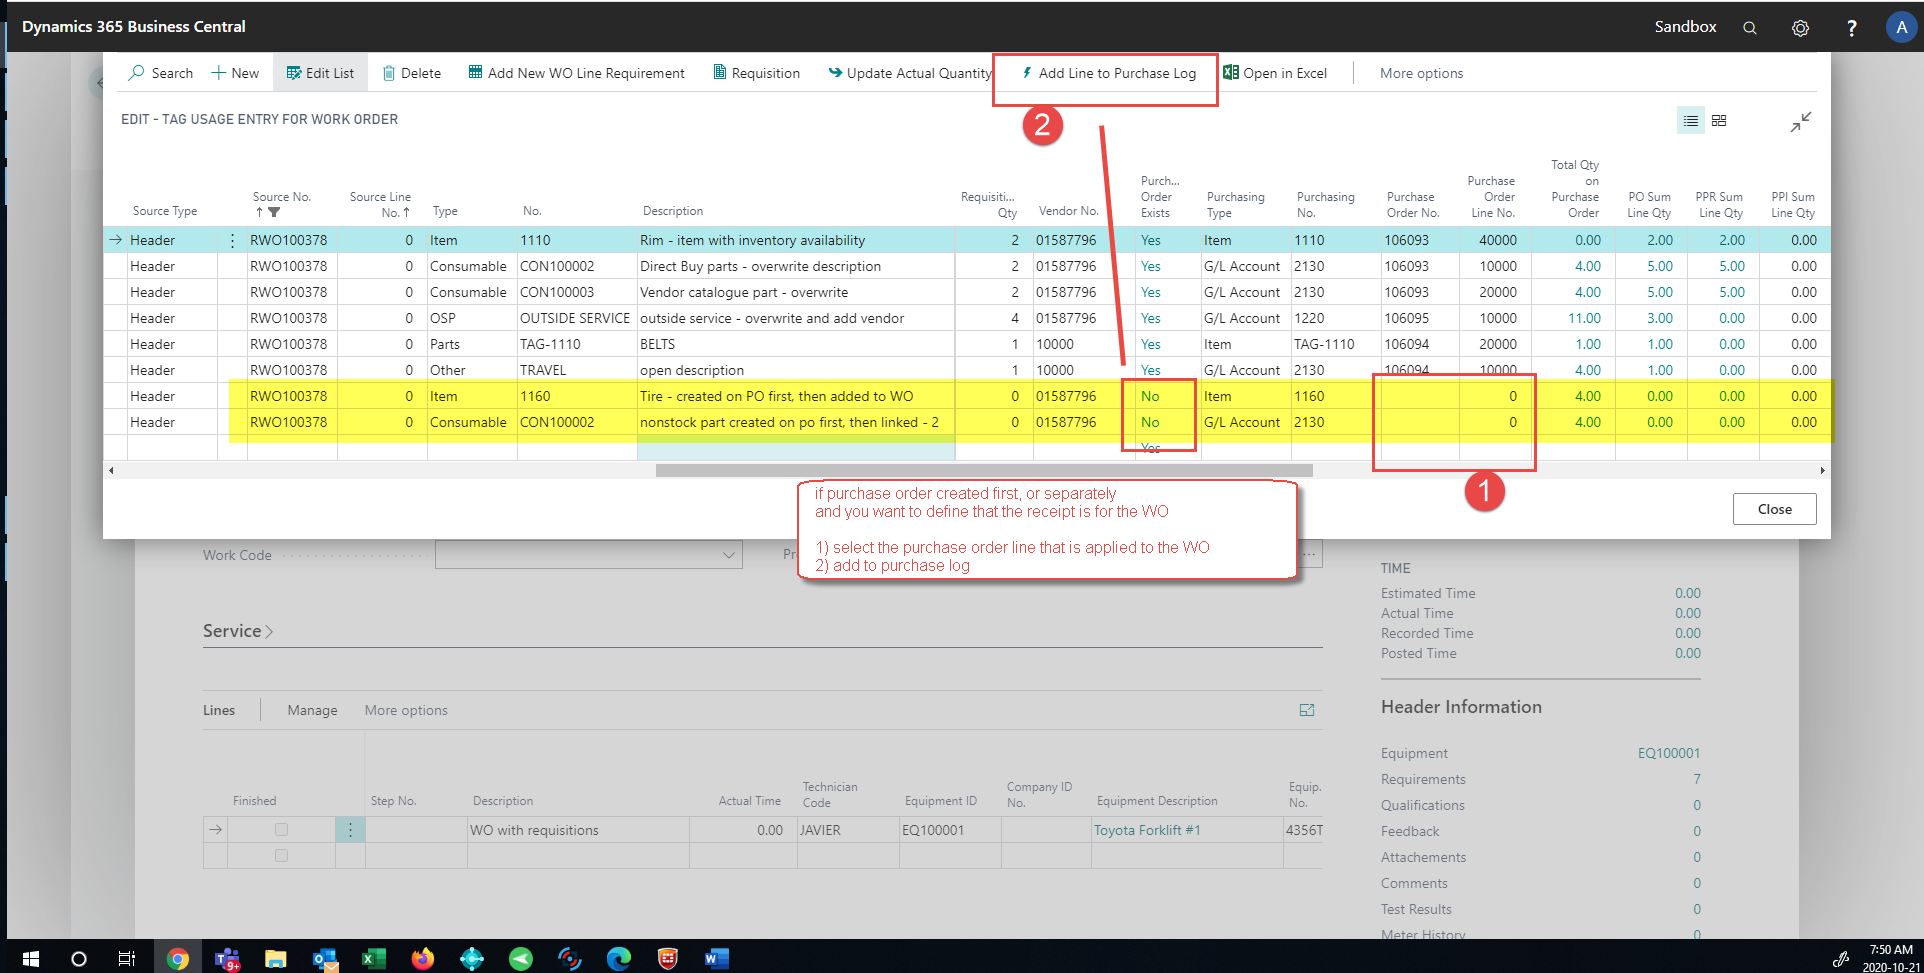
Create purchase order separately from WO and Add purchase order linkage to WO on usage


Place a non-stock requisition onto work order.
Yes. Add requirements usage to work order
(See answer in 3 for screenshot)
Place a requisition without a work order.
Yes. Manually add line to requisition work sheet
(See answer in 3 for screenshot)
Delete a requisition
Yes – It is a line on the requisition worksheet
(See answer in 3 for screenshot of requisition worksheet)
Create a PO from a work order requisition
Yes – Carry out action on requisition worksheet
(see answer in 3 for screenshot of requisition worksheet)
Show how to track a PO back to a work order
Yes – If create purchase order from tag requisition … then automatic
Yes – If requisition is manual, then can link a PO back to WO on usage
(See 3 for screenshot)
Show how to find an existing PO from a displayed work order
Yes – Can drill into PO from the usage on WO
Alternate – Can look up PO from the PO log
(See 3 for additional screenshots)
TAG Project Contract
- Important: TAG Project contract requires TAG Plan = EAM to use, if you're in Express or in CMMS mode, you will receive an error due to plan restriction.
- Note: the below descriptive steps assume that Data Initialization was run and therefore master file data exists in the database. (equipment, personnel, codes)
Start from TAG Maint. Manager Role Center Profile.
- Go to the TAG Planning section and click on the TAG Project Contract menu.
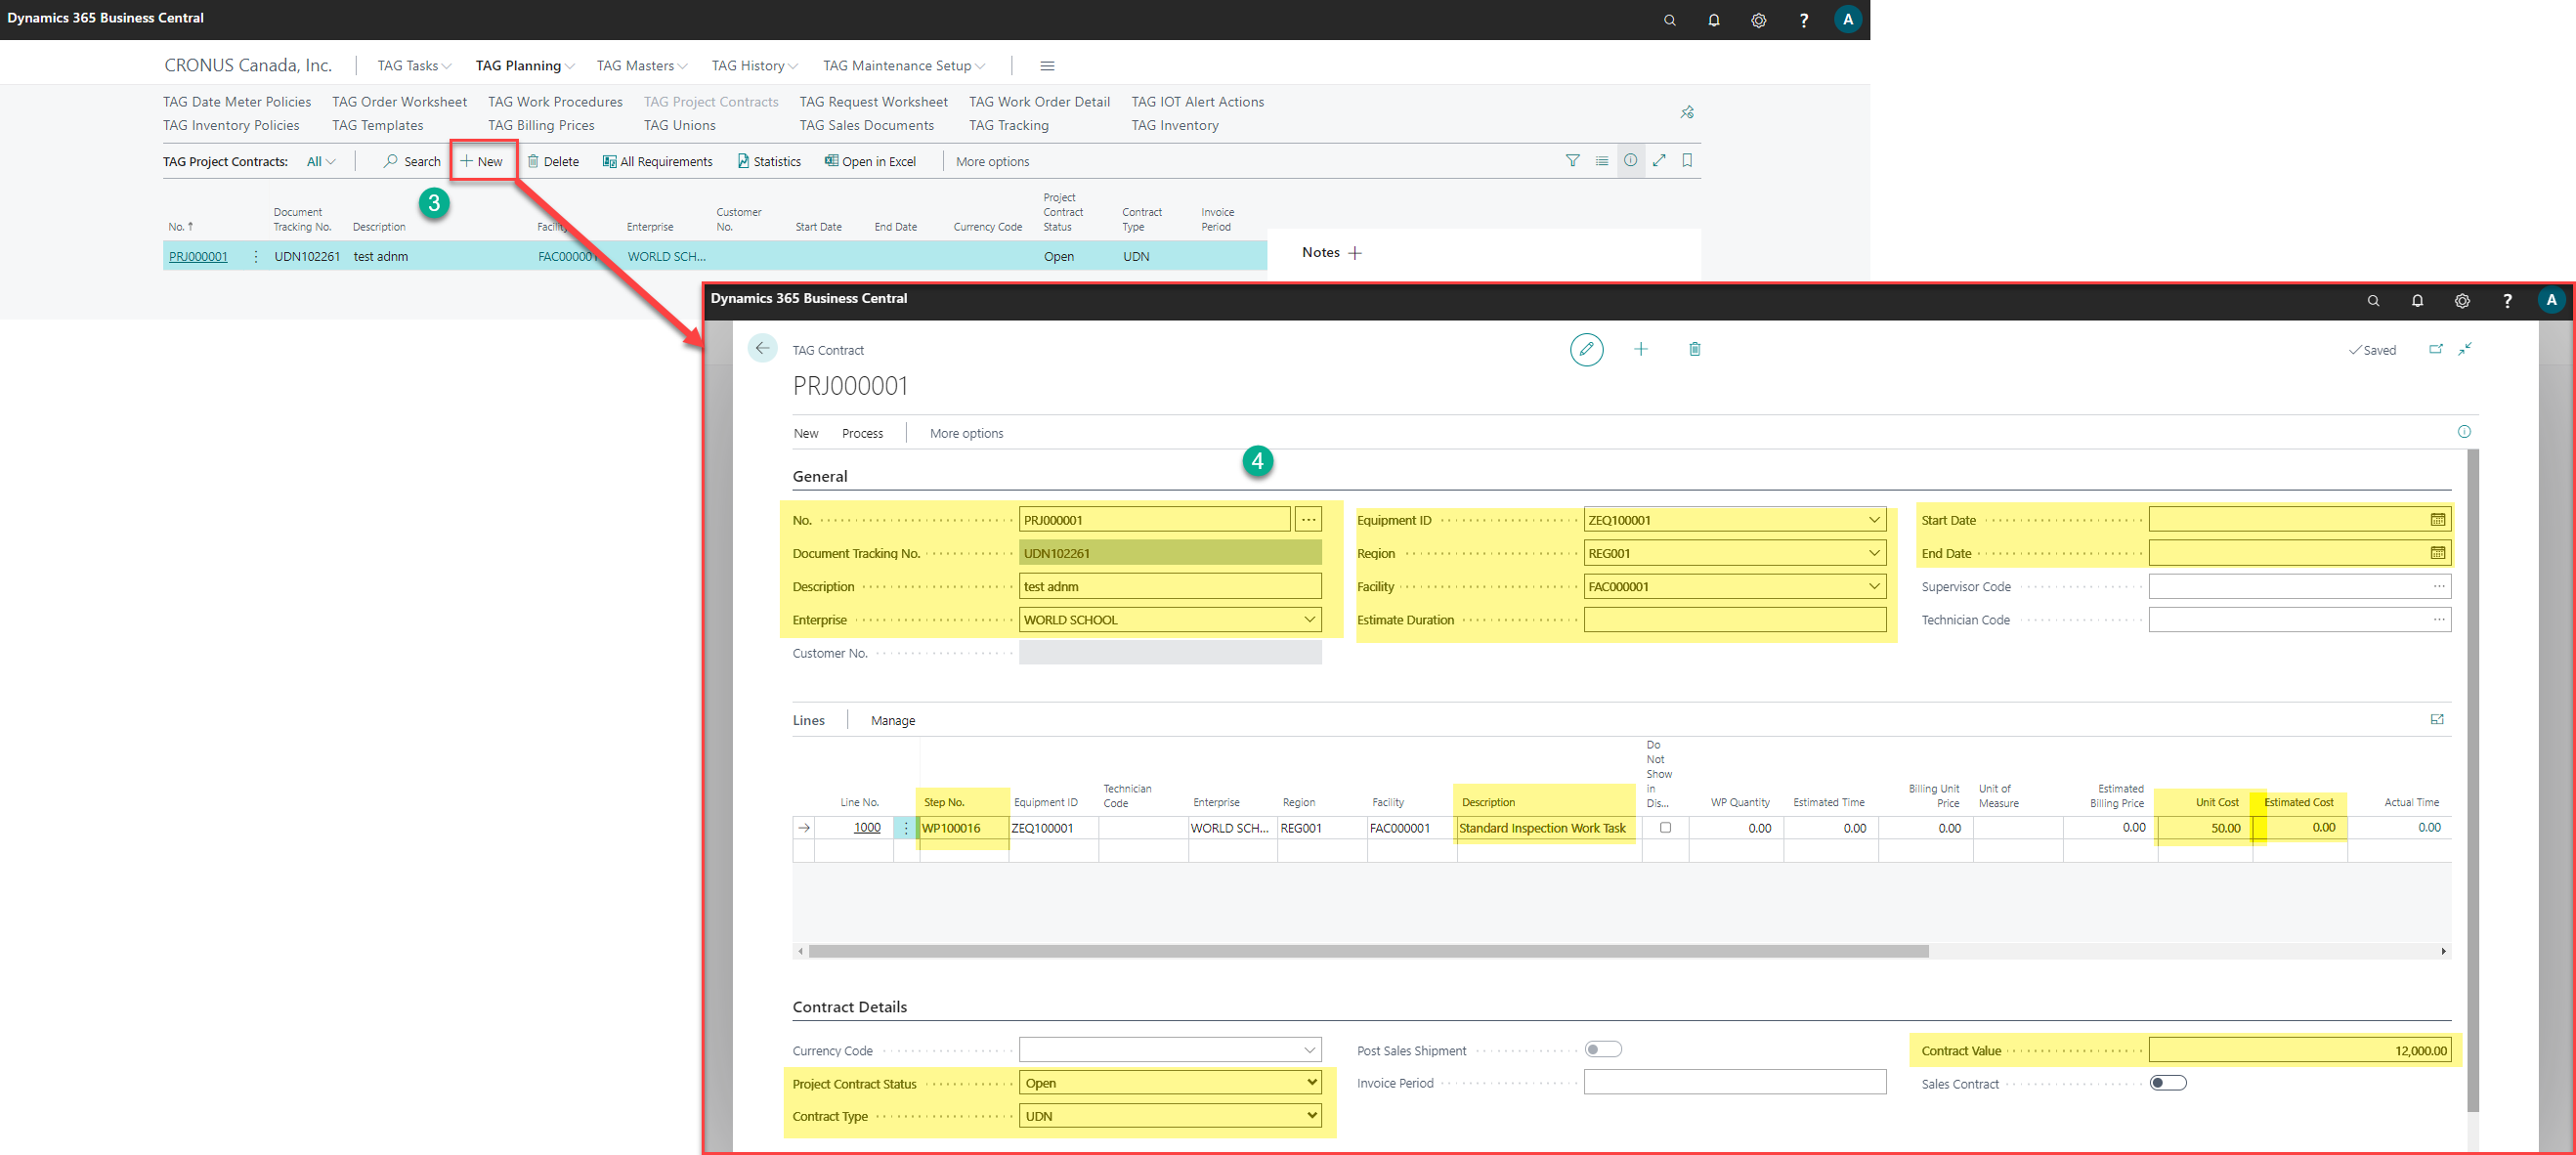
- Click on New button on the ribbon.
- Tab over the No. field (or click on the Description field) to let TAG assign automatically a No.
- Enter the Description,Equipment ID, Enterprise, Facility and all the desired fields.
- Open the Line section, either select a work procedure or enter a description task manually, enter either WP Quantity (flat rate) or Estimated Time and then Unit Cost.
- In the Contract Details FastTab, set Project Contract Status field to Signed.
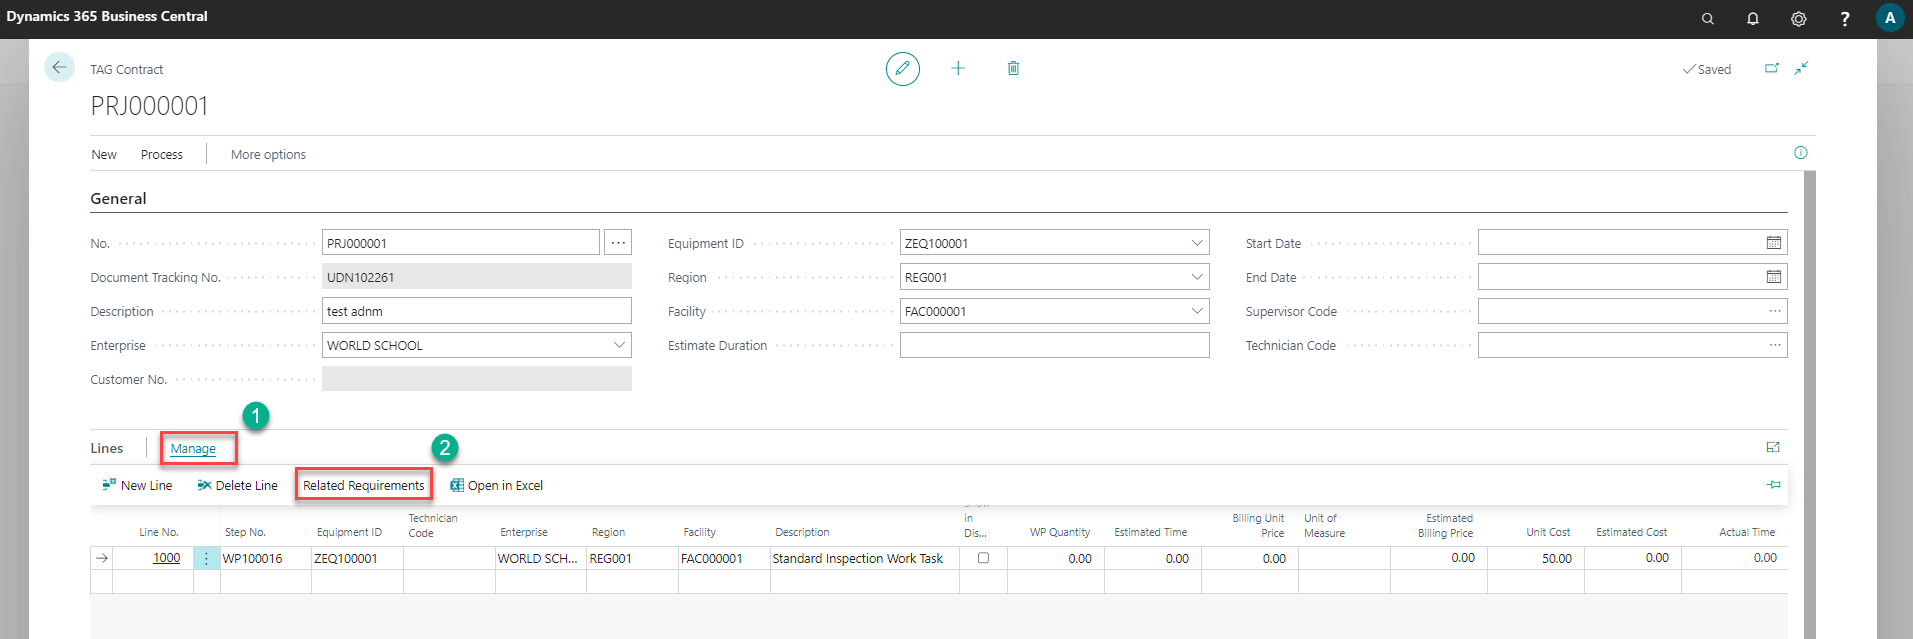
- Go to Lines section and click Manage and then Related Requirement.
- Click New, select Item as Type, enter item No in No field or click on three dots button to open the list and select, enter the Expected Quantity
- Click "New" and repeat the same steps but for Consumable (Type).
Steps:


Create WO from Project Contract:
- Start from TAG Maint. Manager Role Center Profile.
- Go to the TAG Planning section and click on the TAG Project Contract menu.
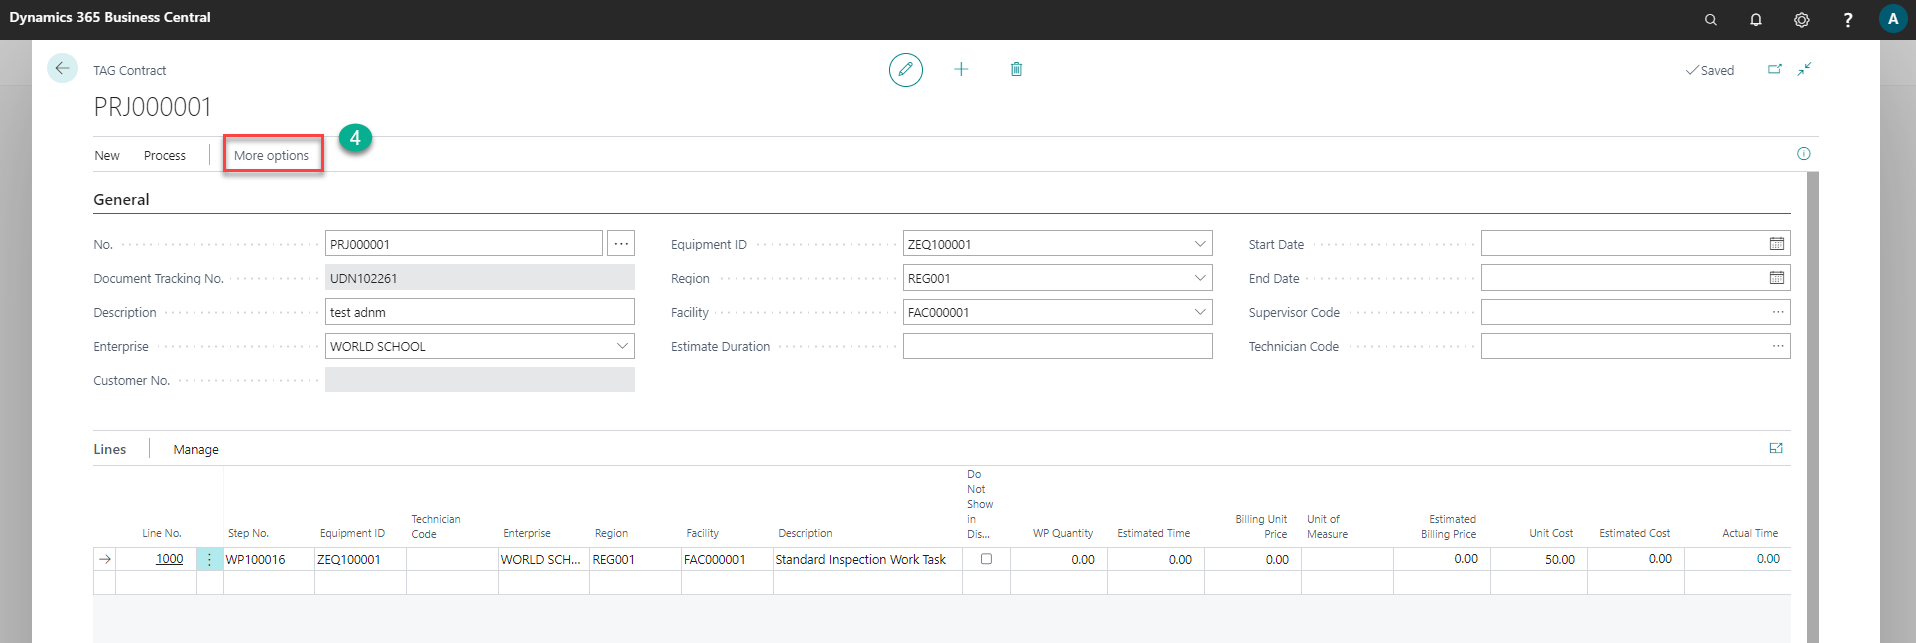
- Select one project contract and click on the No field to open the card.
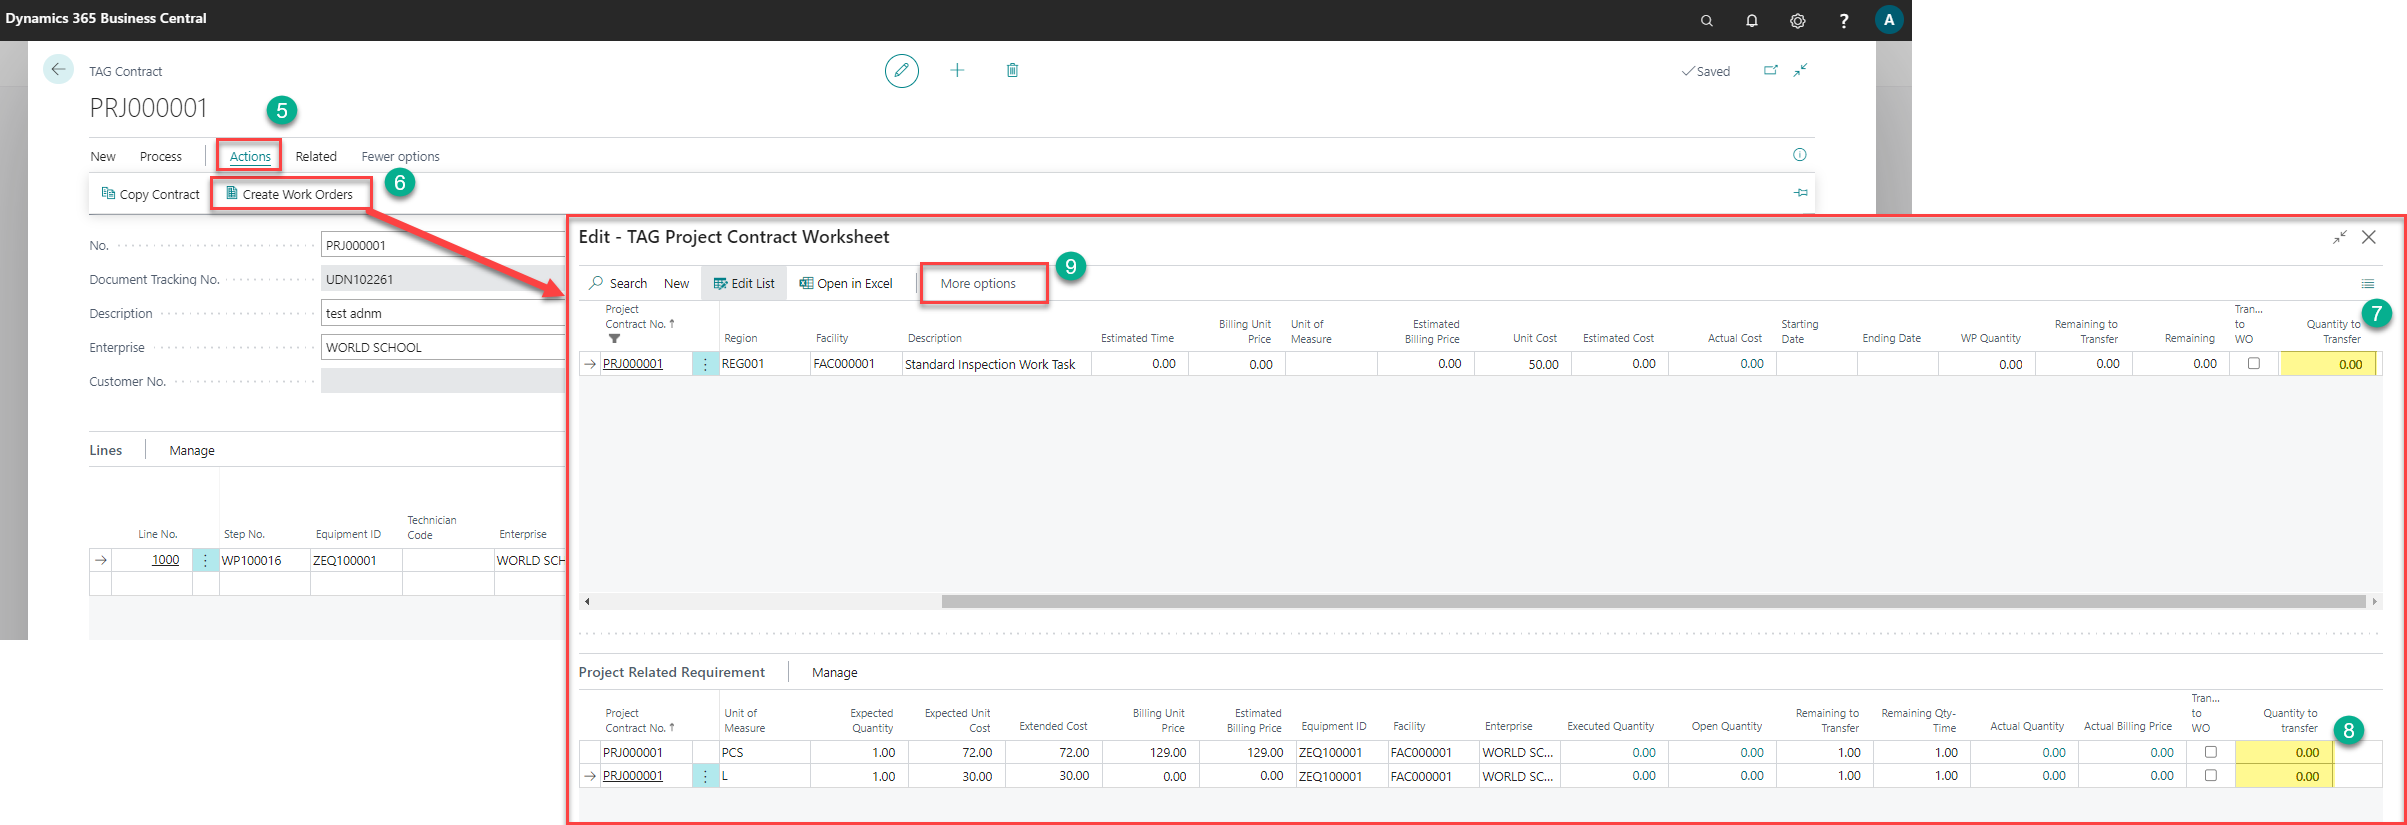
- Click "More Options", Actions and then "Create Work Orders" buttons
- In Project Worksheet list, enter Quantity to Transfer
- In Related Requirement list, enter Quantity to Transfer
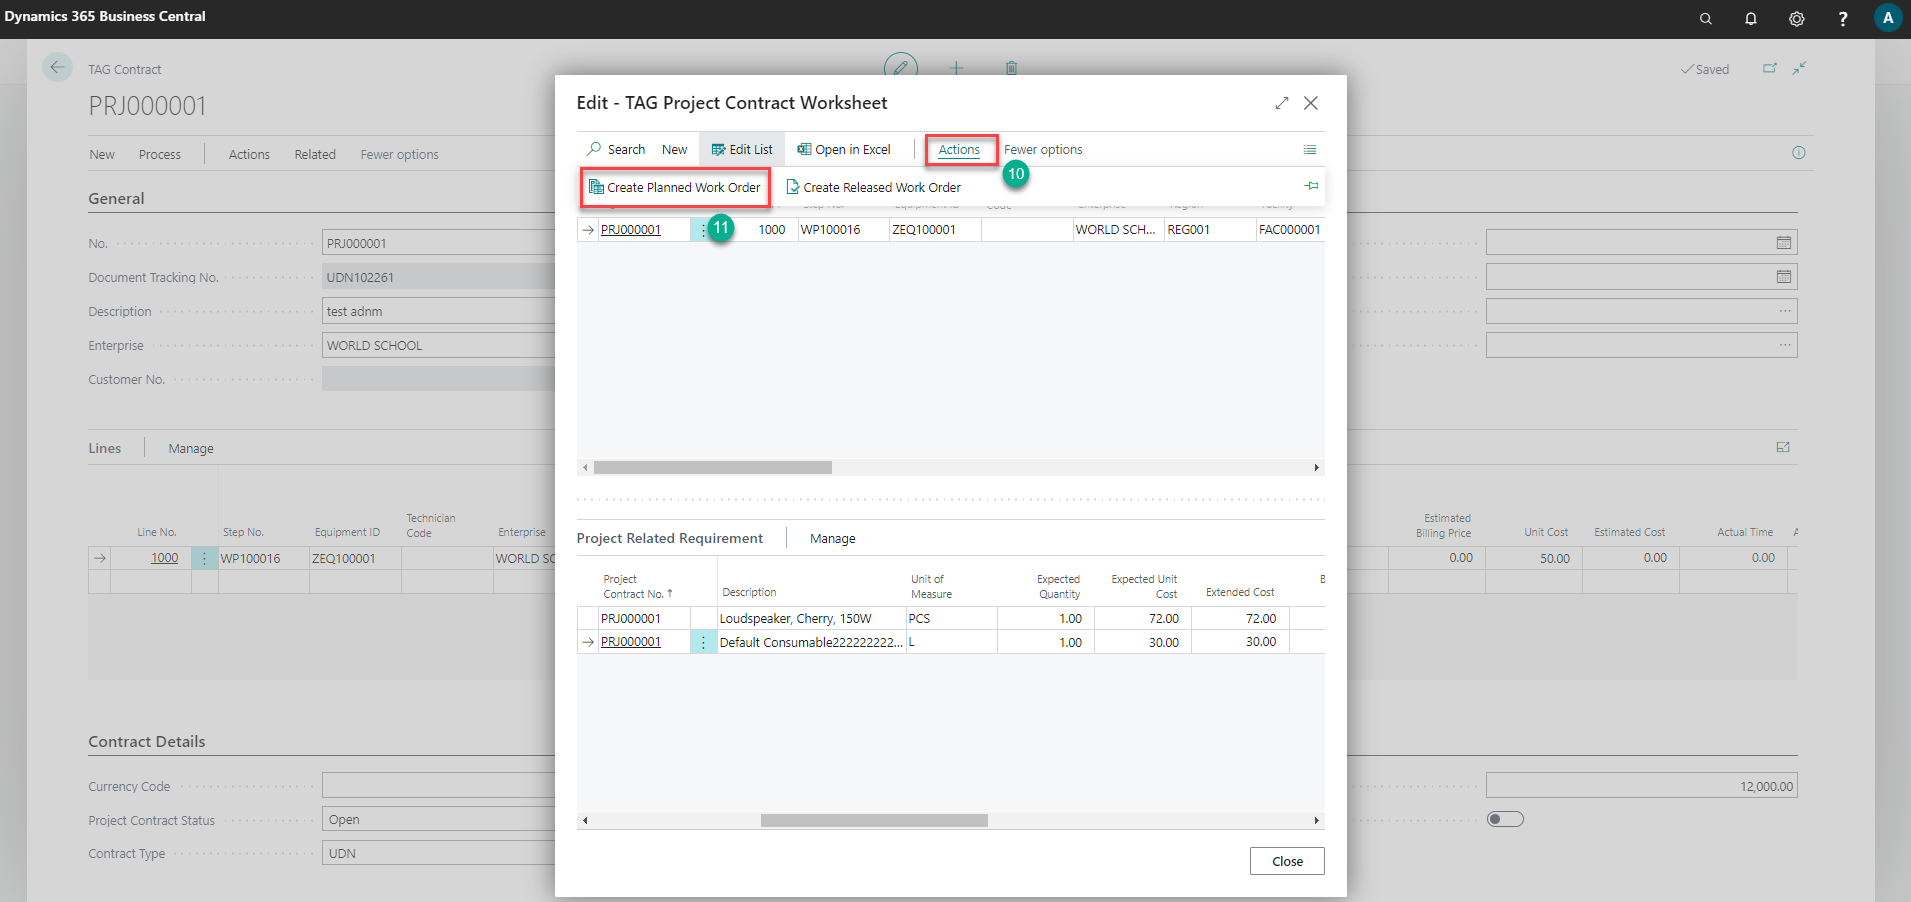
- Click "More Options", Actions and then "Create Planned Work Order" buttons.
- A new Work Order will be created and showing the card
Steps:

View related WO from Project Contract:
- Go to the TAG Planning Section and click on the TAG Project Contract menu.
- Select one project contract and click on the No field to open the card.
- Click "More Options" and then "Navigate" buttons.
- Notice that there are three buttons to use to get the related Project Work Orders; "Planned Work Orders", "Released Work Orders" and "Finished Work Orders" buttons.

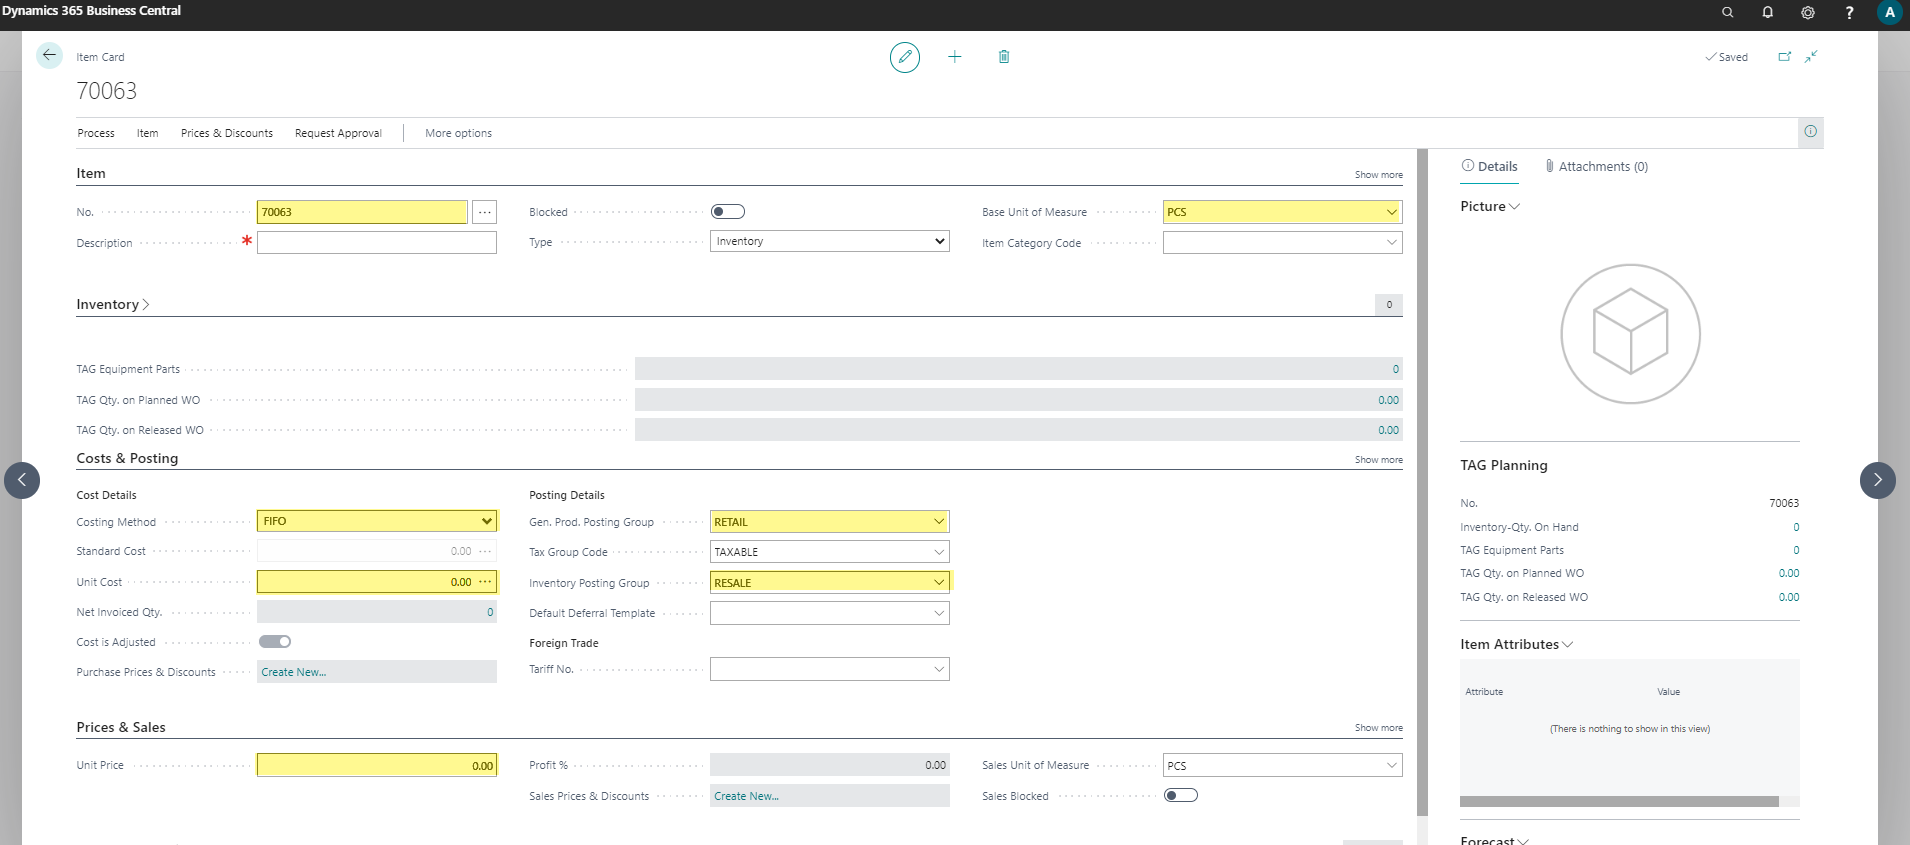
TAG Master Files
This section contains tools on what is maintained (Equipment), who maintained (Resources) and what is used (Related Requirements).
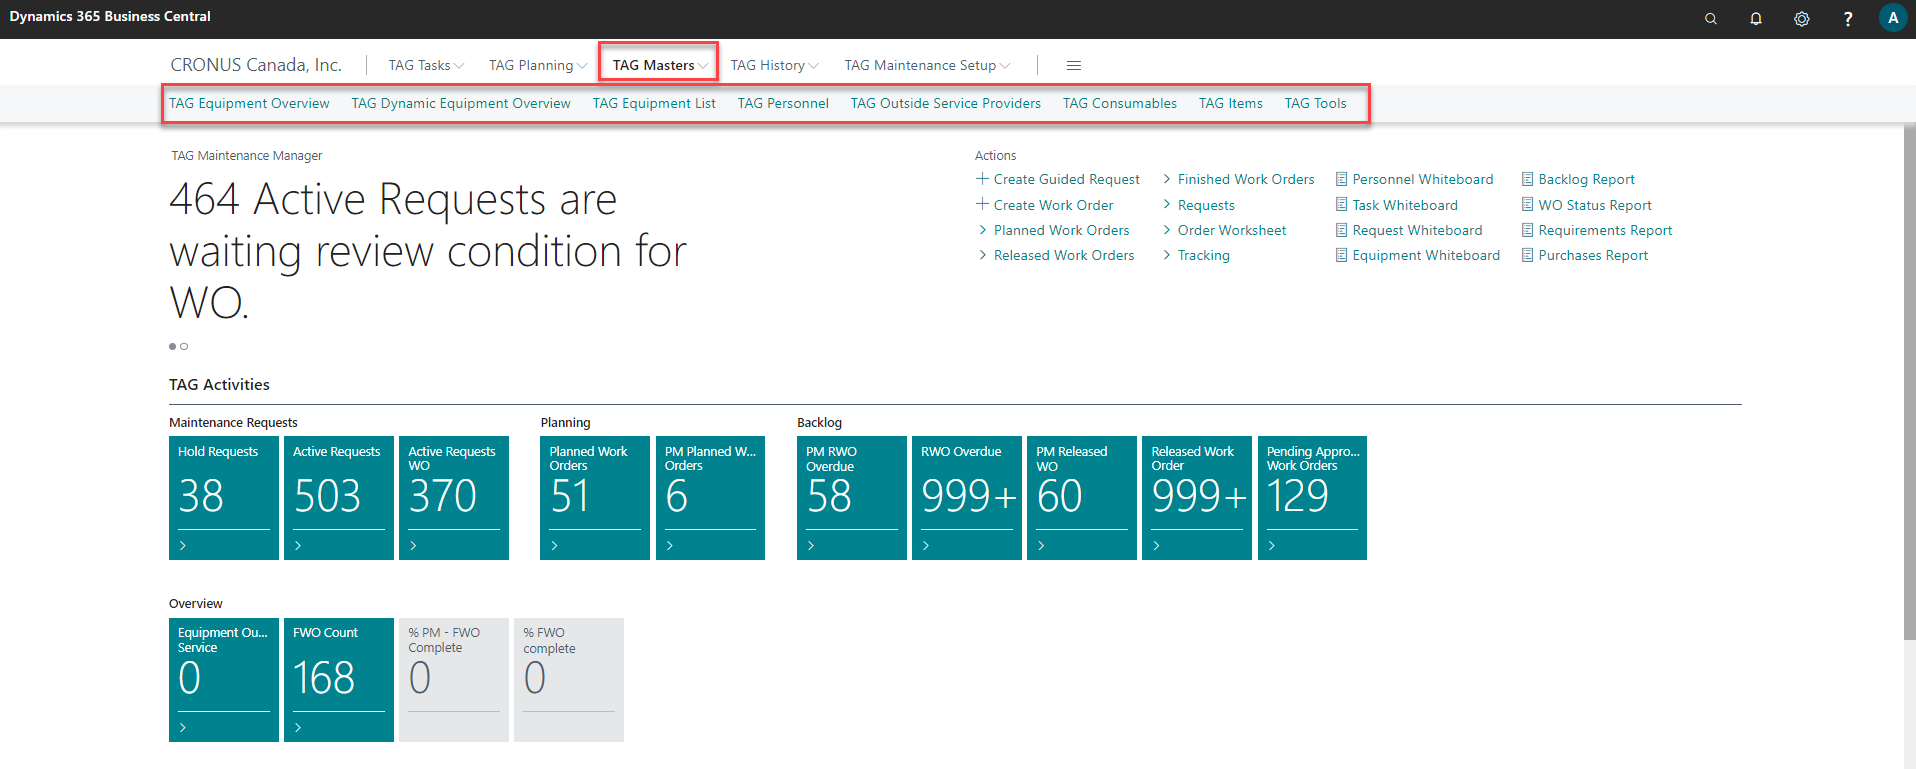
TAG Equipment Overview
Create a new Equipment:
- In the TAG Masters menu, click on the TAG Equipment Overview to open the list.
- Click "New" button on the ribbon to create a new Equipment.
- In the General FastTab, Tab over the ID. Field (or click on the Description field) to let TAG assign automatically Equipment ID or type manually the desired ID.
- Enter the Description, Facility, Region, Address, Equipment group and Duty type fields.
- On the Source FastTab, enter date of purchase, purchase cost, manufacturer equipment serial No and install date fields. 6 Click "Close" to validate.


TAG Oustide Servie Provider (OSP)
Create a new Outside Service Provider (OSP):
- In TAG Masters Menu, click on the "Outside Service Provider" to open the existing list.
- Click "New" button to create a new Outside Service Provider.
- In the General FastTab, tab over the No. Field (or click on the Name field) to let TAG assign automatically a No or type manually the desired no.
- Enter the name and address fields.
- In the Cost FastTab, enter the Charge type to hourly and Hourly Rate fields.
- Close the page and refresh to validate the list.


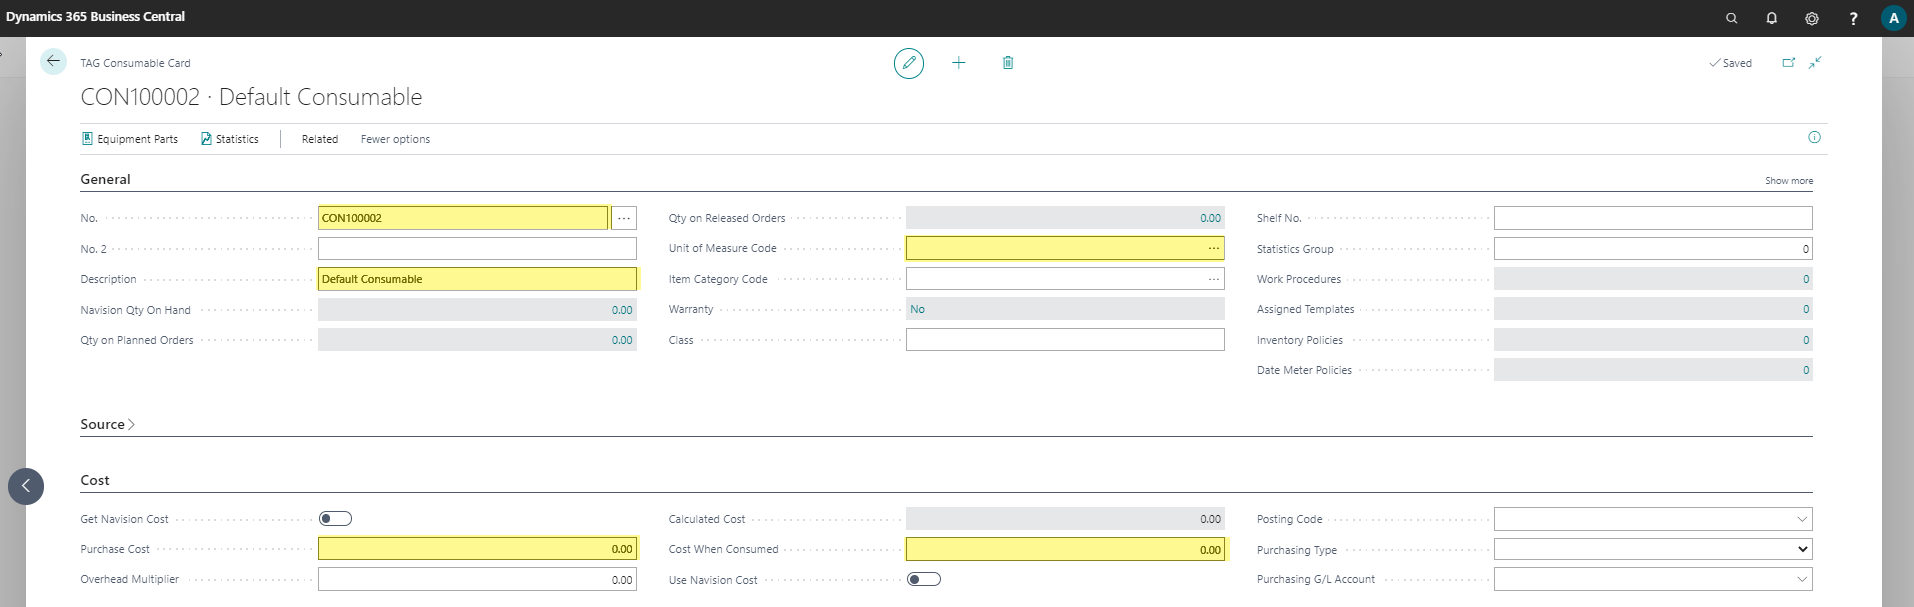
TAG Consumables
Create a new Consumable:
- In the TAG Master menu, click on the TAG Consumable to open the existing List.
- Click "New" button to create a new Consumable.
- In the General FastTab, Tab over the No. Field (or click on the Description field) to let TAG assign automatically Equipment No or type manually the desired No.
- Enter the description and unit of measure code fields.
- On the Cost FastTab enter cost when consumed and posting code fields.
- Close the page and refresh the list to validate.

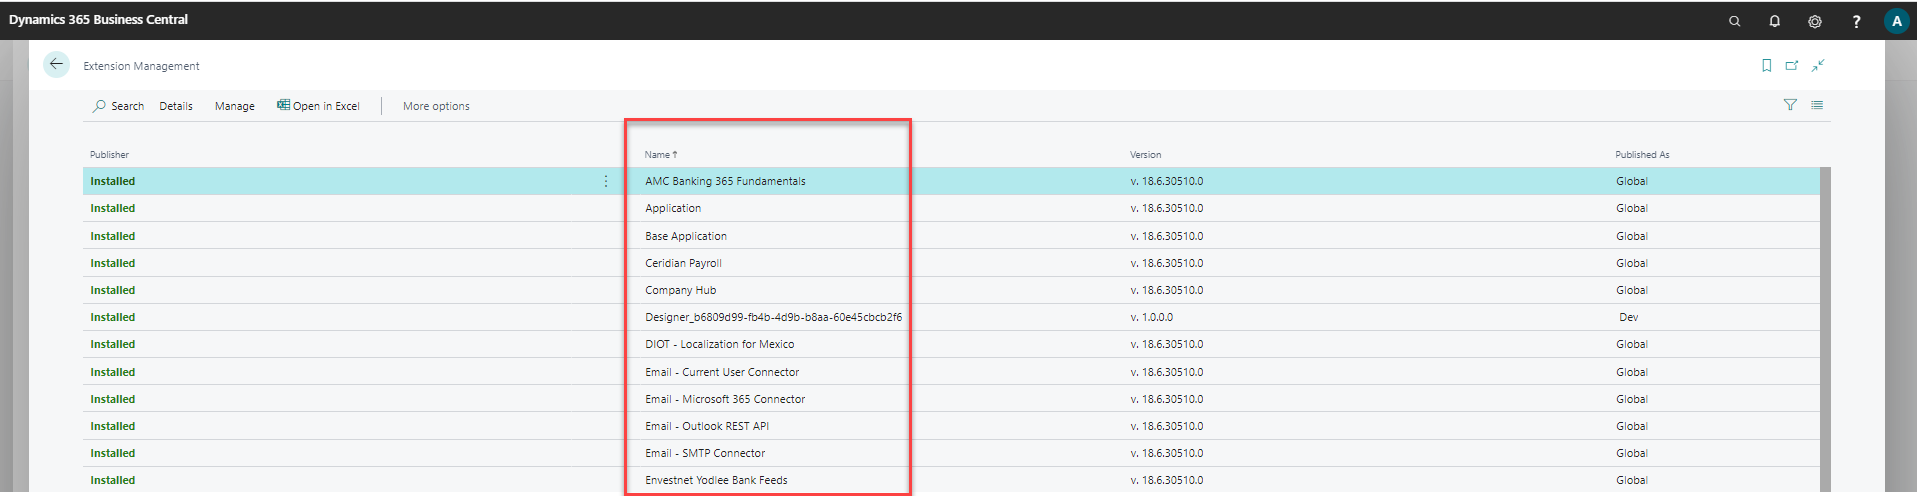
TAG Upgrading
Onpremise upgrating :
Upgrade of TAG assumes that the user has installed TAG extension package, has installed master data, and has created transactional data using TAG.
An upgrade of TAG involves updating the TAG extension package while maintaining the existing data and then reapplying the data to the upgraded package.
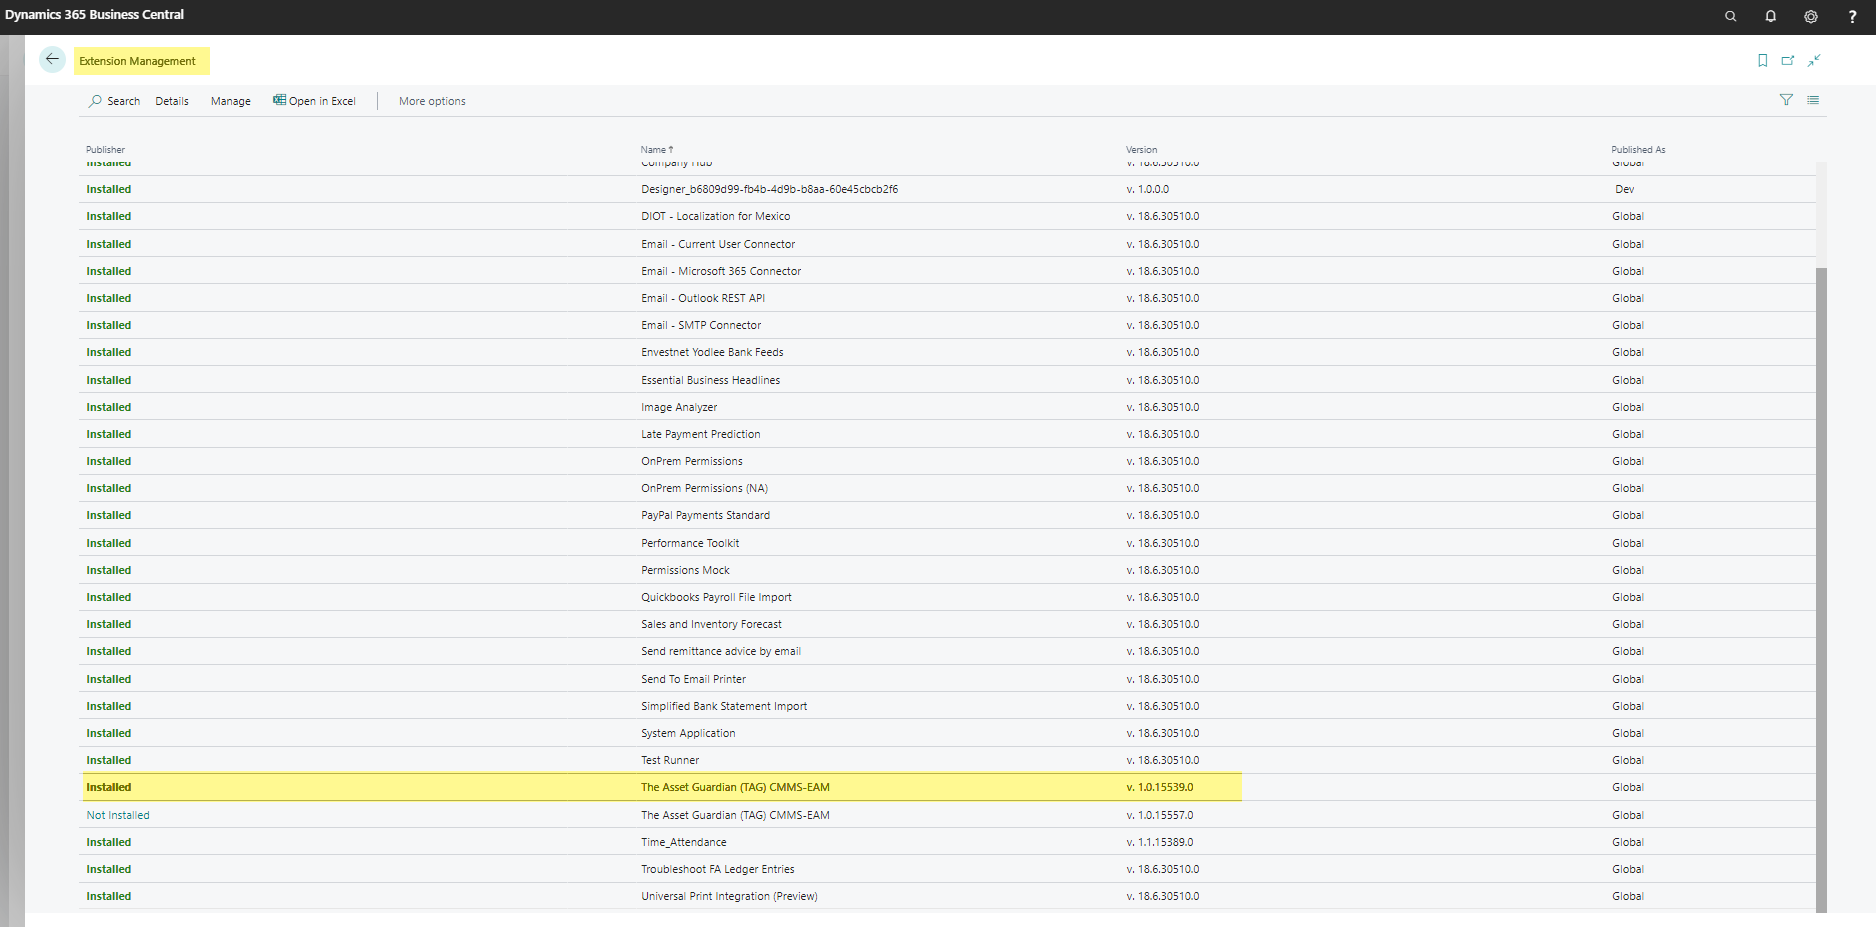
To upgrade TAG, you will need to first uninstall the existing TAG extension package, then load a replacement TAG extension package (TAGNew.app).
This process follows the same instructions for unpublish and uninstall as described in section TAG installation files, and publishing and installing as described in section TAG installation files
When finished the upgrade of TAG, the result will have the installed TAG extension package with the existing data as before the upgrade.
Steps:
Verify the current version and the current data.
Uninstall and unpublish the current version:
- Install and publish the new version:
- Load the new TAG extension package before republishing and reinstalling:
- You should have the new version with restored data .
Online upgrading :
Go to the Business Central administration center and set the update date for your sandbox environment to the current date. The sandbox will be updated within the closest available update time window that you set for it. Now, you can test your existing extensions and your production data against the new version.
We recommend that you set the update date for your production environment a few days or weeks in the future, to help make sure that it does not get updated automatically before you had a chance to test the new version and your extensions in your sandbox environment.
For more information on updating the application for the online solution, click HERE